Close


Page 1 of 2 12 LastLast
Results 1 to 25 of 35
  1. #1

    Default Fox 4 lug brake rotors/bearings/races differences by year?

    I'm in the middle of a full brake refresh and am running into a few problems ordering and receiving the correct brake parts. I've only installed the calipers, pads and hoses at this point.

    Thanks to FoxChassis who Posted on Stangnet:
    '79-'93 Front Rotor Diameter:
    9.31" - '80-'81
    10.06" - '79 and '82-'86 (exc. '84-'86 SVO), '87-'93 w/ I4
    10.84" - '87-'93 w/ V8 (exc. '93 Cobra "R")
    10.91" - '84-'86 SVO
    13" - '93 Cobra "R"

    I think I have it all sorted now but need new bearings to go into my new front rotors with races already installed on Bendix PRT1175 with 9.3" OSD. Does anyone know the correct size for bearings for the 9.3" rotor? For SKF brand there are two different inners (BR 17 or 68149) and two different outers (A12 or LM12749 VP).


    My M81 is a 2.3 Turbo Ghia and has build date of 07/80 and Vin 0F03A..... My Marti report lists the A as the NA 2.3L and below adds the Turbo to the feature list. LFAPS says my A in the vin indicates a non-turbo (W for Turbo) so parts become a crapshoot sometimes.

    FWIW and to maybe help others with 1980/81 cars I have ordered the following based on 9" rear drums:

    Rear

    Drums: My part #D9ZC-1126-AA = 9"
    wheel cylinders: with the 1/4" bleeder.
    Rear center hose: # D9ZZ2282A or 4536829
    Shoes: 1.75"
    Shoe Spring kit: 1R3Z2225AA Motorcraft BRSK7246A needed for 9" brakes
    Emergency brake kit: 1R3Z2V041BA pass and 1R3Z2V041AA driver I ordered Motorcraft BRAK2597 & BRAK2596 to fit the 9" brakes as the first generic set was for the 10" and had fitment issues last year. BTW Motorcraft box says Made in China- probably getting the same stamped crap and putting their name on it.

    Front
    Master Cylinder: #D8BZ-2140-A for Power brakes, Bore: 7/8 In. or .0875 with 12mm and ½” -20 x 1, rear 7/16
    Rotors: Ford# 9.3" OS DIA, I ordered Bendix PRT1175= Made in China
    Calipers: Forgot Ford# will update= for 9" Rear Drum; M12 x 1.0 Inlet
    Front Hoses: 4536854, D9BZ2078A, E0SZ2078A, E0ZZ2078A uses the M12mm x 1.0 thread on one end and standard 7/16 on the other.Length Overall (IN) 13.200. I ordered two BH98945 and the hoses are different (one is smooth and one has a bunch of small rounds/ridges like my OEM). Both installed fine.
    Pads: #151M semi-metallic for 9.3" rotor

    Stay healthy everyone!
    Last edited by m81mclaren; 11-09-2020 at 09:26 PM.
    Current FEP:
    1980 M81 McLaren Carb Turbo 2.3T #003P ... IT'S ALIVE after a 22 year slumber thread!

    Past FEP:
    1986 Capri GS 5.0- very missed but in goods hands
    1985 LTD SSP- quick little fox 5.0

  2. #2
    FEP Super Member gr79's Avatar
    Join Date
    Jun 2009
    Location
    SE Michigan
    Posts
    5,149

    Default

    Many changes and different parts in the span of 10 years. Rotors, calipers, shoes, spindles, etc.
    Then the aftermarket confuses more with multiple interchange or house numbers for the same part.
    Used RA and NPD for p/n ref and purchases. Seem to be more consistent and clear in the brake area than chains.
    Early 10/79 build. Brake changes starting 12/79. A spindle change for 10" rotors?
    Calipers- First came with the larger 14mm hose hole version.
    Have noticed no difference using same pads and the 12mm version calipers, which also fit with a hose change,
    C-Tek 6064 9.3 rotors. So far, so good.
    A17 set/L68149 inner brg 1979-83 all, 84-93 non-V8.
    A12 set/LM12749 outer brg 1979-93 all.
    https://www.npdlink.com/1979-1993-mu.../front-spindle

    Changing out the calipers next year. Have them and new brake hoses on the shelf.
    One caliper may be sticking or dragging. There was ds dust, more than ps.
    When i did new rotors and brgs, may have loosened them up installing new pads.
    Keeping an eye for brake dust on the rims. So far ok.

    Just checked inside the new hose boxes. Plastic bag packaging inside a box. Raybestos 14mm.
    Both hoses are the same have yellow index lines and thick partial sleeve, no ringed ridge things,
    Last edited by gr79; 11-09-2020 at 10:31 PM.

  3. #3

    Default

    Thanks for the reply and confirmation GR!
    Current FEP:
    1980 M81 McLaren Carb Turbo 2.3T #003P ... IT'S ALIVE after a 22 year slumber thread!

    Past FEP:
    1986 Capri GS 5.0- very missed but in goods hands
    1985 LTD SSP- quick little fox 5.0

  4. #4

    Default

    Almost all done but that LR adjuster wheel pivot arm is not lining up properly. I posted all pics in my slumber thread. Previously my factory Ford adjuster arm came off and broke and was replaced with a generic aftermarket. I assumed it was the 10" brake version so now after my rebuild I used a Motorcraft unit but it is exactly like the generic and is still off even with all new parts. Suggestions on what may be off?

    Comparison from Right side...that side installed fine.

    That red spring is tricky!

    Manual adjustment is fine but that arm is still not parallel.
    Current FEP:
    1980 M81 McLaren Carb Turbo 2.3T #003P ... IT'S ALIVE after a 22 year slumber thread!

    Past FEP:
    1986 Capri GS 5.0- very missed but in goods hands
    1985 LTD SSP- quick little fox 5.0

  5. #5
    FEP Power Member
    Join Date
    Nov 2007
    Location
    San Mateo, CA
    Posts
    2,274

    Default

    Here is a picture from my 84. Everything including the brake shoes seem to be original. Ok picture not loading.
    Last edited by KevinK; 11-16-2020 at 03:46 PM.
    Fox Body/3rd Gen MCA Gold Card Judge
    84 SVO 24K miles, 85 Mclaren Capri Vert. 84 GT Turbo Vert.
    88 Mclaren Mustang Vert 20K miles, 89 Mustang LX Sport Vert,
    03 Mach 1 7900 miles, 74 Mustang II, 69 Mustang, 67 Mustang, 07 GT500,
    14 Mustang CS/GT, 15 F150 FTX Tuscany, 16 F250 Crewcab, 67 Tbird 47K miles

  6. #6
    Moderator wraithracing's Avatar
    Join Date
    Jun 2010
    Location
    Grand Junction, CO/RR TX
    Posts
    14,209

    Default

    The pictures appear to be the same side that is confusing me a bit. It's been a long day, so I might be mistaken since I don't have a Mustang in front of me to look at, but there should be a left and right adjuster lever as well as left and right adjuster wheels. It appears you have the same for both sides if the pictures are actually of different sides of the vehicle. If I am correct the adjuster cable and lever should be at the rear of the vehicle meaning on the back side on both sides. I would double check that first, otherwise please verify the pictures to help diagnosis. Good Luck!
    ​Trey

    "I Don't build it hoping for your approval! I built it because it meets mine!"

    "I've spent most of my money on Mustangs, racing, and women... the rest I just wasted."

    Mustangs Past: Too many to remember!
    Current Mustangs:
    1969 Mach 1
    1979 Pace Car now 5.0/5 speed
    1982 GT Stalled RestoModification
    1984 SVO Still Waiting Restoration
    1986 GT Under going Wide Body Conversion Currently

    Current Capris:
    1981 Capri Roller
    1981 Capri Black Magic Roller Basket Case
    1982 Capri RS 5.0/4spd T-top Full Restoration Stalled in TX
    1984 Capri RS T-top Roller
    1983-84 Gloy Racing Trans Am/IMSA Body Parts

  7. #7

    Default

    Thanks guys sorry the pics here are of my left rear only. I know this is lame that I can't seem to get a brake job done without at least one issue!

    The adjuster wheel for this driver side sits towards the rear side of the drum and is marked L as is the arm that the red spring attaches to. That arm should ride against the adjuster wheel but is not quite engaging the teeth properly and is angled down slightly. On my right side that arm sits parallel to the ground and engages the adjuster teeth correctly (not pictured). More pics are on my main thread here with both sides if it helps!


    My Left driver's side

    How it's supposed to be per LMR install video...


    Basically looking for advice if there is any way to help move my arm so it engages properly with the adjuster wheel as LMR demonstrates. I can't figure out a way to do so on this side.
    Last edited by m81mclaren; 11-16-2020 at 09:41 PM.
    Current FEP:
    1980 M81 McLaren Carb Turbo 2.3T #003P ... IT'S ALIVE after a 22 year slumber thread!

    Past FEP:
    1986 Capri GS 5.0- very missed but in goods hands
    1985 LTD SSP- quick little fox 5.0

  8. #8
    FEP Super Member erratic50's Avatar
    Join Date
    Dec 2016
    Location
    Nebraska
    Posts
    4,575

    Default

    Is the cable for the adjuster stretched?

    I would be curious to see what yours would look like if you adjusted it up more by hand and got to where you can just barely get the drum on and off.

  9. #9

    Default

    Quote Originally Posted by erratic50 View Post
    Is the cable for the adjuster stretched?

    I would be curious to see what yours would look like if you adjusted it up more by hand and got to where you can just barely get the drum on and off.
    Its worth a shot as I’m not sure where to from here. I have it adjusted about halfway in the pic. Drum slides off easily and I can feel some resistance.
    Current FEP:
    1980 M81 McLaren Carb Turbo 2.3T #003P ... IT'S ALIVE after a 22 year slumber thread!

    Past FEP:
    1986 Capri GS 5.0- very missed but in goods hands
    1985 LTD SSP- quick little fox 5.0

  10. #10
    FEP Super Member xctasy's Avatar
    Join Date
    Jun 2012
    Location
    Dunedin 9011, New Zealand, South Pacific
    Posts
    3,961

    Default

    The 10 rear brakes are for wagons. The adjusters are different between the standard 9 inch drums and the 10 inch ones. Siurce the right adjusters.

  11. #11
    FEP Power Member Jerry peachuer's Avatar
    Join Date
    May 2014
    Location
    Royal oak Mi
    Posts
    1,447

    Default

    Grab each side of the shoes without the drum and you can shift the whole assy maybe 1/4 inch in either direction.. this may help to.center the assembly and adjuster .. this is how the rear drum assembly operates.. it wraps and wedges when the shoes touches the moving drum.. just as thought

  12. #12
    FEP Power Member Jerry peachuer's Avatar
    Join Date
    May 2014
    Location
    Royal oak Mi
    Posts
    1,447

    Default

    Or try hooking the cable different to the self adjuster
    Don't change the orientation of the cable as you have it just the connection at the self adjuster
    And you can also rotate the cable guide under the secondary spring some just push it up with screwdriver it will seat differently everything is free to move some if everything is installed as it should be then grab the right side of the drum and use your thumb and squeeze the cable this will move up and cycle the star adjuster and should stay if the correct adjuster is used meaning thread rotation of the adjuster

  13. #13
    FEP Power Member Jerry peachuer's Avatar
    Join Date
    May 2014
    Location
    Royal oak Mi
    Posts
    1,447

    Default

    Grab right side of backing plate and use your thumb to pull on cable to actuate the self adjuster

    I stated right side of the drum above that doesn't make sense and my periods are random lol
    My phone is a grammar champ

  14. #14

    Default

    Quote Originally Posted by xctasy View Post
    The 10 rear brakes are for wagons. The adjusters are different between the standard 9 inch drums and the 10 inch ones. Siurce the right adjusters.
    Good thought X. This was my original thinking as well when my factory Ford adjuster pivot arm broke and I sourced a new one. It was sitting wonky so my thought was I got a 10" version or my original brake adjuster cable was stretched. This time I purchased the Motorcraft BRAK2596 which is the full adjuster kit for the 9" rear brakes. It matches in size to the original (slight shape difference but that part doesn't touch anything) as well as the previous generic arm. Also my new shoes, adjusters, adjuster cable, and springs all match up basically identical in size/shape to my original parts. I'm thinking it has to do with my emergency brake cable itself to compensate?

    Left side Ford arm (came off and bent where it meets the secondary shoe a year ago) vs. generic replacement arm I installed in its place . This replacement sat wonky before so this weekend it got swapped along with everything else from the Motorcraft kit BRAK2596 (made in China) which too is still sitting wonky on this side! All 3 match up basically in size/shape except the original is a little beefier where it engages the secondary shoe.


    Quote Originally Posted by Jerry peachuer View Post
    Or try hooking the cable different to the self adjuster Don't change the orientation of the cable as you have it just the connection at the self adjuster And you can also rotate the cable guide under the secondary spring some just push it up with screwdriver it will seat differently everything is free to move some if everything is installed as it should be then grab the right side of the drum and use your thumb and squeeze the cable this will move up and cycle the star adjuster and should stay if the correct adjuster is used meaning thread rotation of the adjuster
    Thanks Jerry I tried that too as it seemed the spot where a lot of tension is to put the arm in the right position to contact the adjuster teeth. Will take it apart and try and reseat that. Also I had to pop each side of the shoes in to get it to sit correctly at the top pivot point as well as the wheel cylinders to center things and slide the drum on. I've tried moving the whole shoe assembly around but that doesn't seem to move the adjuster arm where it contacts the wheel teeth. When I take it apart again I'll see if the parking cable itself can be adjusted at the backing plate connection or maybe where it enters the arm (the arm that connects to the secondary shoe). Make sense? Is there cable adjustment on the end at the center console parking brake lever? This shouldn't be rocket science so sorry for the long post. It's been 30+ years since I've played with drum brakes on my 85 LTD SSP or 86 Capri!

    I'll also tell you that I had a hell of a time stretching that red lower spring and hooking it to the adjuster pivot arm. Took everything I had to get that on after several tries and once my pliers slipped off and I whacked myself in the face good! The LMR video of course made that look simple.
    Last edited by m81mclaren; 11-17-2020 at 12:12 PM.
    Current FEP:
    1980 M81 McLaren Carb Turbo 2.3T #003P ... IT'S ALIVE after a 22 year slumber thread!

    Past FEP:
    1986 Capri GS 5.0- very missed but in goods hands
    1985 LTD SSP- quick little fox 5.0

  15. #15
    FEP Power Member Jerry peachuer's Avatar
    Join Date
    May 2014
    Location
    Royal oak Mi
    Posts
    1,447

    Default

    Alligator long and narrow vice grips will help with this red spring

    Moving the shoes would move that clip and help seat the assembly but sounds like your good there and you may be onto something with the e brake

    There's a theaded rod adjustment in the interior of the car that will extend or shorten cable tension
    If your ebrake is sticking on you maybe this will be giving you trouble very simple adjustment but center counsel piece has to be removed for access.. just the inner piece of the counsel if I recall

    Look at the end of the ebrake cable where it enters the backing plate inside the drum assembly there's a spring around the cable

    Maybe a visual to see if that spring is in a free state or squished and storing energy which may give you adjustment issue

    Just some thoughts

    If your left handed the left side is easy .. I bet your right handed and the right side just snapped together like nothing.. just messing but its true for some reason

  16. #16
    FEP Super Member gr79's Avatar
    Join Date
    Jun 2009
    Location
    SE Michigan
    Posts
    5,149

    Default

    How true that being rt or lt handed can affect car work.

    Brake work is interesting not as intense or complicated as body work, heavy repair suspension, engine/trans.
    The reset opposite of show or go work.

    I clean then work in a light coat of disk brake grease to inside adjuster screw threads and end of star wheel that the cupped thing goes on to.
    Taking the drums off and go in there every so often to clean area and inspect for wear and oddities.
    Helps refresh memories of the area.

    A classic foot long style brake plier tool, with the big sharp hook on one end, is a handy tool for much easier plus safer work.
    Is a tool you think you really don't need to buy or appreciate to do infrequent drum brake jobs until using one.

    One quick way i found to connect the red spring, cable and adjuster to the shoe is to do it as one operation.
    Hook red spring and cable onto star adjuster ratcheting arm.
    Cable is not routed around the curved thing yet but kept under some tension to keep it hooked to star adj arm.
    Hook the star adjuster arm hole with plier hook, pull everything down, then hook arm tab into the brake shoe slot.
    Once star adjuster arm is installed into shoe, pry cable up around the curved metal bracket.
    A foot long hd screwdriver helps in coaxing things along.

    Maintain awareness of what to grip, how and when to move, like climbing a tree or something.
    Video helps watch how pros do drum brakes.
    They work too fast to study and memorize every move from live takes in a shop (if they let you out there).
    Remembering what parts go where and when.
    Have a few shops that let me supervise to an extent and answer questions about the car and even bs about tech.
    Would like to see line workers do new ones on (assuming) the axle plant assy line.
    Last edited by gr79; 11-17-2020 at 05:10 PM.

  17. #17

    Default

    Thanks so much for the additional ideas. I am going to pick up a $10 drum spring tool that looks like it will help a lot with taking apart and reassembling (and save another hit to my ugly mug!). Will look at the e-brake cable/spring again and make sure it has movement and compare the length to the other side. If there is a difference I'll pull the console and see if tightening it up. I'll post up what i find.
    Current FEP:
    1980 M81 McLaren Carb Turbo 2.3T #003P ... IT'S ALIVE after a 22 year slumber thread!

    Past FEP:
    1986 Capri GS 5.0- very missed but in goods hands
    1985 LTD SSP- quick little fox 5.0

  18. #18
    FEP Power Member
    Join Date
    Nov 2007
    Location
    San Mateo, CA
    Posts
    2,274

    Default

    I have not taken on apart drum in 2 years or so. You should not need a tool the hang the bottom spring. Just screw the adjuster all the way in. Hook the adjusting lever, hook the spring and push up on the lever to hook the cable. Once you have that, run the adjuster out until you can barely slip the drum on.
    Fox Body/3rd Gen MCA Gold Card Judge
    84 SVO 24K miles, 85 Mclaren Capri Vert. 84 GT Turbo Vert.
    88 Mclaren Mustang Vert 20K miles, 89 Mustang LX Sport Vert,
    03 Mach 1 7900 miles, 74 Mustang II, 69 Mustang, 67 Mustang, 07 GT500,
    14 Mustang CS/GT, 15 F150 FTX Tuscany, 16 F250 Crewcab, 67 Tbird 47K miles

  19. #19

    Default

    Well we took the LR brakes apart for the 4th time and tried all suggestions except in the cabin cable adjustment. Same result. We'll try the ebrake adjustment tomorrow. We bled the brakes but the Left F caliper will not produce any fluid out of the bleed screw. We have all new rubber hoses, new/rebuilt calipers, and new pads. I figured maybe the master was not working properly so we went ahead and replaced it too. In thinking about this lack of fluid I'm wondering if the original master is actually OK because there only 1 feed for the fronts and the right flowed and bled fine. Maybe there's some crud blocking flow somewhere at a union on the way down? Anyways, it's good to know everything is new/rebuilt.
    Hope you all are having a good weekend!
    Last edited by m81mclaren; 11-21-2020 at 07:04 PM.
    Current FEP:
    1980 M81 McLaren Carb Turbo 2.3T #003P ... IT'S ALIVE after a 22 year slumber thread!

    Past FEP:
    1986 Capri GS 5.0- very missed but in goods hands
    1985 LTD SSP- quick little fox 5.0

  20. #20
    FEP Super Member gr79's Avatar
    Join Date
    Jun 2009
    Location
    SE Michigan
    Posts
    5,149

    Default

    Yup reset all rear drum adjustments to 'zero' wear position.
    Check wheel cyl pistons are all the way in like disk caliper pistons are reset in to clear new pads.
    Could always blow out the front lines with air then re bleed.
    Disconnect LF line at caliper and see if it bleeds.
    Of course keep some fluid in the new m/c resv. or re bench bleed it in car.
    If the old m/c squirts on bench, it is prob good.

  21. #21

    Default

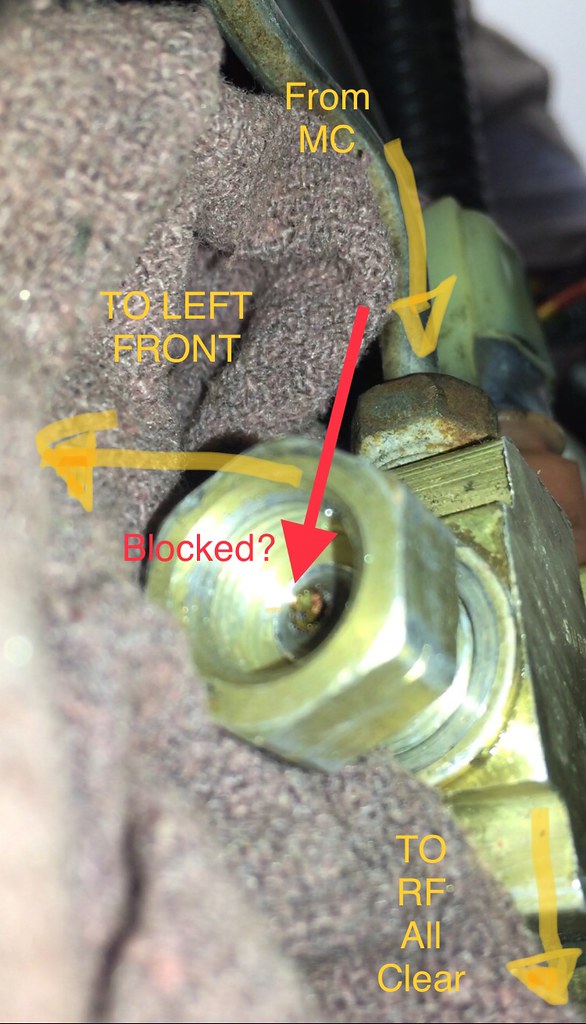
    I have no fluid out the left front lines at bleed valve, the hard line to rubber junction by the shock or from the combination valve (I wrote union yesterday) at the left front port. I pulled the line from the master to the p-valve and that is clear (and should be since I'm getting fluid to RF), I then pulled the left front line from the P-valve and get nothing out of that hole even if I force air in from the top port from the MC or pump the brakes. I can loosen the larger nut just behind the LF port that the line connects to but it will not come all the way out. I can force air/some fluid through the threads blowing through the front top port but not much. I poked a paperclip in the LF exit port on the p-valve and it goes in about 1/2 inch. I'm assuming maybe there is an issue with the valve or some heavy blockage inside @ this LF port? I pushed 40lbs of air pressure and also re-assembled everything and get no fluid @ the bleeder or @ the union with full brake petal pumping. So it must be this valve right? I'll look into a replacement or see if it can be disassembled and cleaned. After 4 hours of this I quit for the day to give my back a rest and skipped the eBrake adjustment as it's secondary to getting the LF caliper to work. A few pics of what I am describing...
    New Master Cylinder


    Proportioning Valve?


    LF port must be blocked somehow This view is from the firewall looking towards the front...
    Last edited by m81mclaren; 11-22-2020 at 10:38 PM.
    Current FEP:
    1980 M81 McLaren Carb Turbo 2.3T #003P ... IT'S ALIVE after a 22 year slumber thread!

    Past FEP:
    1986 Capri GS 5.0- very missed but in goods hands
    1985 LTD SSP- quick little fox 5.0

  22. #22

    Default

    Update: a friend who works at a brake shop said that the combination valve (combo distribution block/proportioning valve) is locked as a safety as there was a problem on my LF at some point. Apparently these things can detect a pressure loss and block off that port so you don't lose all your fluid. I have to figure out how to unlock it and get it back to the center position so it will flow again. My brake light is not on although it should have triggered in this situation. That light will come on if I pull up the ebrake. Sounds like some more disassembly is required to see if I can push the piston back at the blocked port.
    Last edited by m81mclaren; 11-22-2020 at 10:35 PM.
    Current FEP:
    1980 M81 McLaren Carb Turbo 2.3T #003P ... IT'S ALIVE after a 22 year slumber thread!

    Past FEP:
    1986 Capri GS 5.0- very missed but in goods hands
    1985 LTD SSP- quick little fox 5.0

  23. #23
    FEP Super Member gr79's Avatar
    Join Date
    Jun 2009
    Location
    SE Michigan
    Posts
    5,149

    Default

    Don't know if any of this is of any new info value.
    If anything its mental exercise reading plus trying to help.
    Ford uses the right words to describe things.

    Got out the 79 shop manual, drum brake group, single cyl dual piston.

    "Adj lever should contact the adj wheel 3/16" (+- 1/32") above the centerline of the screw.
    If it is below, adjustment lever will not lock on the wheel teeth, screw won't turn."
    Checks were listed about this:
    a,b,c,d,e,f.
    Short dummery:

    A-d is about the cable, cable guide, fittings, crimp condition length. 8" is 8-7/16" long, 10" version is 9-3/4". +/- 1/64"
    Measure cable from inside edge of the hook to the far edge of the anchor hole.

    E is pivot hook squareness on the adj lever
    F is adj screw sockets are seated in their brake shoe web notchs.

    Per manual; procedure installing adj lever, automatic adjuster spring, cable with hook:
    12- Hook the cable hook into the hole in the adj lever
    13- Position the hooked end of adj spring completely in the large hole in primary shoe web
    14- Pull the adj lever, cable, a nd automatic adj spring down anf toward the rear to engage the pivot hook in the larte hole in sht secondary shoe web
    15- Pull on cable, between cable guide and adj lever toward secondary shoe web. to check the action of the adjuster.


    There is mention of backing off emergency brake to allow "seating of upper shoes against the anchor pin and the shoes are centered on the backing plate.
    "If they are not seated, back off park brake sys adj to obtain 0.005-0.025 inch play after overcoming the load of the parking brake link spring."

    Then rechecked about bleeding the system, front disc:
    "In bleeding the ft brakes, the metering valve bleeder rod at front of the prop valve, has to be pulled out 1/16".
    Done by using a clip like tool.
    This detail is mentioned if using a pressure bleeder but not mentioned for manual bleeding. Omitted? Not required?
    Cannot recall doing anything like that to get the job done.

    No mention of how to flush the front part.

    Below is a cutaway view of the valve as shown in the manual. There are Kelsey Hayes and Wagner types.
    Only diff i see is prop valve housing orientation, located at bottom of assy. Wagner's is slanted, KH is vertical.

    Kelsey Hayes type:
    Name:  brakes prop valve cutaway 3030.GIF
Views: 135
Size:  12.0 KB

  24. #24

    Default

    Derrick,

    The "thing" in your last photos is technically called a combination valve. It contains a proportioning valve for the rear brakes at the front of it. In the middle of it is a differential pressure valve. This is accessed by removing the fitting nearest the firewall, then pulling out the valve assembly. This is an area of the brake system which is never, ever cleaned, so the shuttle part of the this valve can get stuck due to gunked up brake fluid. I would remove the entire valve from the car, remove the differential pressure valve at the rear, the proportioning valve at the front and thoroughly clean the entire thing out with solvent and bottle brushes.

    There is a company called Muscle Car Research who sells rebuild kits for the valves that include new o-rings.

    The labeling on the ports in the photo linked below is wrong, but it does allow one to see both valves inside the unit. The M/c primary port is always connected to the front brakes.

    http://cliff.hostkansas.com/images/2009/cvalve_name.jpg

    Working on drum brakes is pointless if you don't have the two or three specific tools for doing so. I now have all three tools and no cars with drum brakes!

    The cars that used 9.3" front brakes is not that simple.

    In 1979 they were used on 2.3l and 2.8l applications. All other 1979 cars had the 10" brakes.

    From 1980 to 11/81 they were used on all cars. After 11/81, the 10" front brakes were used on everything until the SVO.

    I would check that the small cable is wrapped around the cable guide on the rear brake shoe. Sometimes the rear brake shoe spring doesn't go through the hole in the brake shoe correctly and that makes the cable guide not sit properly, which changes the cable length.
    Jack Hidley
    Maximum Motorsports Tech Support

  25. #25

    Default

    Derrick,

    You can unscrew the brake light warning switch from the top and slide the shuttle valve back and forth with a jewlers screwdriver to unstuck it, but if it got stuck, it is because the internals are all gunked up and it all really needs to be cleaned out.
    Jack Hidley
    Maximum Motorsports Tech Support

Page 1 of 2 12 LastLast

Posting Permissions

  • You may not post new threads
  • You may not post replies
  • You may not post attachments
  • You may not edit your posts
  •