Close


Results 1 to 8 of 8
  1. #1

    Default Manual steering conversion, the hard way

    I'm rebuilding the front end on my '84 LTD LX and decided to replace the rack as well. I've owned a lot of old Fords with manual steering and always liked it. So, why not stick a manual [non-power] rack in the LTD? Simplify things and save a few bucks. Manual racks for Fox bodies aren't exactly falling from the sky but I read that the more common Pinto/Mustang II racks are nearly identical. The only difference is that the Pinto rack mount bolts are spaced 16" apart where the Fox mounts are 15.5". With a set of offset bushings they drop right in.

    The first step was acquiring a rack. A new Pinto rack from Rockauto was $103.78 after shipping. It seemed like a good deal at the time. As you will read in the following, this rack is only a bargain if you have the time and tools necessary to make it work.

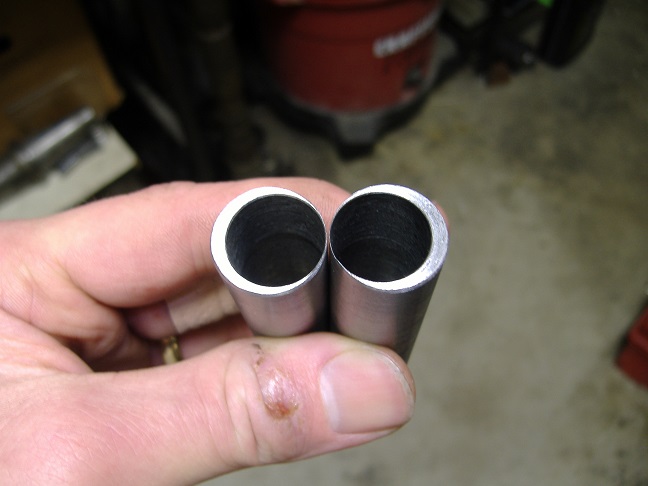
    The next step was finding a steering coupler. The input shaft on the manual rack is 9/16" 26-spline where the power rack is 3/4" 36-spline. I didn't want one that is held on with a set screw which pretty much leaves two choices; a stock Ford manual rag-joint or the solid shaft from Maximum Motorsports. This car is my daily driver, not a race car. I don't want to feel everything on the road so I went with the Ford coupler. The flange to adapt the stock rag joint to the manual shaft is Ford part# D9BZ-3A525-A. I found a NOS one on ebay for $129.11 after shipping. Probably could have found one cheaper if I had more time to look but I need to get this thing done this week while the kids are on spring break.

    Unfortunately, the flange would not bolt to the input shaft on the new rack. The stock input shaft has a flat side so the coupler can only go on in one position. The new rack did not have a flat which lends me to believe it was originally intended for street rods and not a stock replacement. After grinding a flat in the new input shaft the coupler would slide on but the pinch bolt would not go in. That required grinding the groove in the shaft deeper where the bolt goes through.

    I measured the tie rod length of the stock rack after pulling it out so I could set the tie rods on the new rack to be pretty close before it goes in. With the outer tie rods screwed in all the way the total length was still 1/2" too long. The new inner tie rods were the same length as the stock ones but they didn't thread them as far. I'm not sure if this is how all Pinto racks are or if it is just another blunder with this cheapy rack. As a solution, I cut 3/8" off the outer tie rods so they would screw in farther. Cutting them was easy. Grinding the ends so they were flush with the lock nuts took some time. I used a tool grinder but had to fiddle-fart with shims to actually get the end true because the bodies were not flat or straight. I would grind a little then test fit on the rack. If the lock nut didn't leave a mark all the way around then adjust shims and grind again.

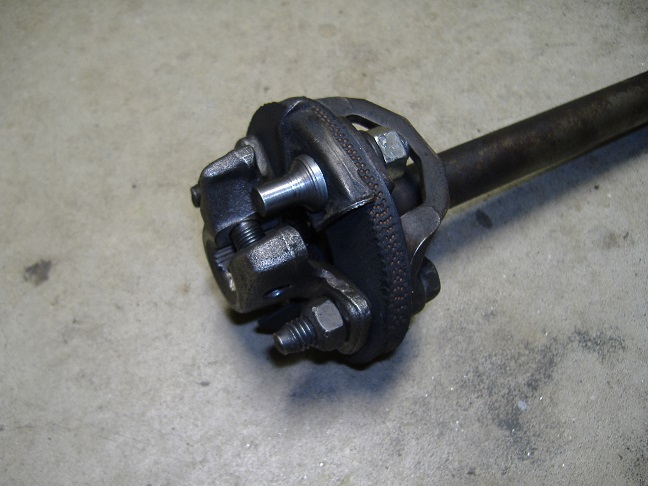
    With all that out of the way it's time to address the mounting issue. I bought some offset bushings from Summit Racing. They state that the bushings will allow you to mount a Fox rack into a Mustang II. It would stand to reason that if you turned the bushings the other way then they would allow mounting a Pinto/Mustang II rack into a Fox. The bushings came with center sleeves and offset washers. The sleeves are for 16mm bolts and the washers are for 12mm bolts. My car has the 16mm bolts so I had to chuck up the washers in a four-jaw on the lathe and bore them out to 16mm. I didn't understand why they had mismatched parts until I went to bolt the rack into the car. The bushings themselves only change the mounting width by 5/16" not the necessary 1/2". Summit expects you to use 12mm bolts in the 16mm ID sleeves to make up the difference! To try and make it fit with 16mm bolts I made some offset sleeves to go in the offset bushings.


    That reduced the distance by 1/8" overall but that still leaves me at 15-9/16" center to center. I was up half the night making the sleeves so I haven't tried fitting it yet. Hopefully there is enough slop in the K-member holes for it to work.
    Last edited by mrriggs; 04-04-2017 at 02:27 PM.

  2. #2

    Default

    I know you didn't want to spend the money on the MM shaft because they are pricey. I had this same dilemma with my 85GT when i put a manual rack on it about two years ago. I ended up finding a swivel/ u-joint for my stock power steeering shaft. I ended up having to have the shaft machined down to fit the swivel. After about two seasons of driving the u-joint chewed up the rack shaft splines so bad that it destroyed both the rack shaft and the u-joint. So i just had to buy ANOTHER rack as well as the MM shaft. The way the MM shaft attaches to the steering rack is WAY better than the set screw setup that i was using with the u-joint setup.
    Last edited by black88coupe; 04-04-2017 at 05:39 PM.
    1985 GT- “Stock-ish” 5.0 motor, AOD/ trans brake. 12.68 @ 10131mph.

  3. #3

    Default

    Quote Originally Posted by black88coupe View Post
    I know you didn't want to spend the money on the MM shaft because they are pricey.
    I actually want the rag joint. If I ever decide to go with a solid shaft it will definitely be the MM one.

  4. #4

    Default

    With the offset sleeves, the rack bolts to the K-member.

    The rag joint I had was floppy and there was a bit of rotational play where it was riveted. I picked up a Dorman 31005 rag joint rebuild kit to fix it. It wasn't until after I had ground off the rivets on the stock rag that I realized that the rubber disk in the kit didn't match. The holes were smaller and it was a larger bolt circle. LMR sells the Dorman 31000 rag joint kit for Fox bodies. Called around and found one local. Get it home to find that it is exactly the same as the 31005 kit.

    At this point I can't put the stock one back in so I'll just have to make it work. Luckily, the outside edges of the holes on the new rubber disk are the same as the old one. So all the necessary material is there, I just needed to put the right size holes in it with a 1/2" end mill. The hardware that came in the kit is all 5/16" thread with 3/8" diameter shoulders. This thing needs 3/8" thread and 1/2" shoulders so I had to make a shoulder bolt with a stud on top to mate up with the flange.


    I used a regular bolt [with a sleeve] on the other side since there is nothing over there that requires a stud. This thing is tight now. The disk is stiffer and there is zero rotational play.

    I start assembling everything in the car and hit another snag. The input shaft on the new rack is an inch or two shorter than the stock shaft so the rag joint hits the bracket on the K-member where the motor mount sits. DANG! This thing is going to fight me every step of the way.

  5. #5

    Default

    The way that the factory as well as MM attaches the steering shaft to the rack is far superior to the slip on set screw types that are available. Keep at it you'll get it. Looks good!
    Last edited by black88coupe; 04-05-2017 at 12:53 PM.
    1985 GT- “Stock-ish” 5.0 motor, AOD/ trans brake. 12.68 @ 10131mph.

  6. #6

    Default

    I ground a notch in the K-member to clear the rag-joint. What's interesting is that the motor mount itself already had the necessary notch made into it. All I had to do was grind a notch in the K-member to expose the notch in the mount.

    I'm out of time and money for this project so getting a new belt and pulley arrangement to eliminate the power steering pump will have to wait for another day. I stole an idea from this thread, http://vb.foureyedpride.com/showthre...power-steering and removed the spring and plunger from the pump so it would internally bypass. Then I plugged the outlet port with a 5/8-18 drain plug and the return port with a vacuum cap.


    When I got it all back together and fired it up, I was astonished at how quiet the car is now. No more "WAAAAAAAHHHH" from the power steering! Sometimes you don't realize just how obnoxious something is until it stops. That one aspect alone has made all this effort totally worth it. Getting rid of the numb and sloppy power steering is just a nice bonus.

    Though, I'm afraid I'm not out of the woods yet. To get the toe-in set, I had to screw the left tie rod completely in and make the rest of the adjustment with the right tie rod so the steering wheel isn't as centered as I'd like. The camber on the left is +0.75°, the right is 0°. When I dial in more negative camber it is only going to exacerbate the toe issue.

    Oh well, at least it's back together and working now.

  7. #7
    FEP Power Member ScreeminChikin's Avatar
    Join Date
    Sep 2002
    Location
    Kansas City, KS
    Posts
    1,742

    Default

    When I did manual on my 82 Capri, I didnt want to have the extra bracket and pulley to delete the pump because that seemed to defeat the purpose. I wanted it all gone. I took the tensioner and was able to reverse the spring so that it worked in reverse. Dont recall exactly how because its been several years but I found it on the interweb so the info is out there. Very clean way to do it.

    Name:  DSCN2689_resize.JPG
Views: 621
Size:  190.0 KB
    '90 LX Sport 5.0\T5
    '90 GT 331\T5
    '90 Notchback 5.3LS\S480 Turbo\TH400

  8. #8

    Default

    Thanks for the tip. That does look very clean and simple. My only concern is that because I'm running a mechanical fan, there won't be enough belt on the water pump pulley to keep it from slipping.

Posting Permissions

  • You may not post new threads
  • You may not post replies
  • You may not post attachments
  • You may not edit your posts
  •