Close


Page 23 of 61 FirstFirst ... 13212223242533 ... LastLast
Results 551 to 575 of 1501
  1. #551

    Default

    Quote Originally Posted by 82GTforME View Post
    Nice find on the hood and scoop Dave. you put a lot of effort into the one that came off your car. Would you drill holes in it and save the work you've done or would you start from scratch on it?

    I hope your son enjoys the wheels. My son never had good luck with his first mustang.

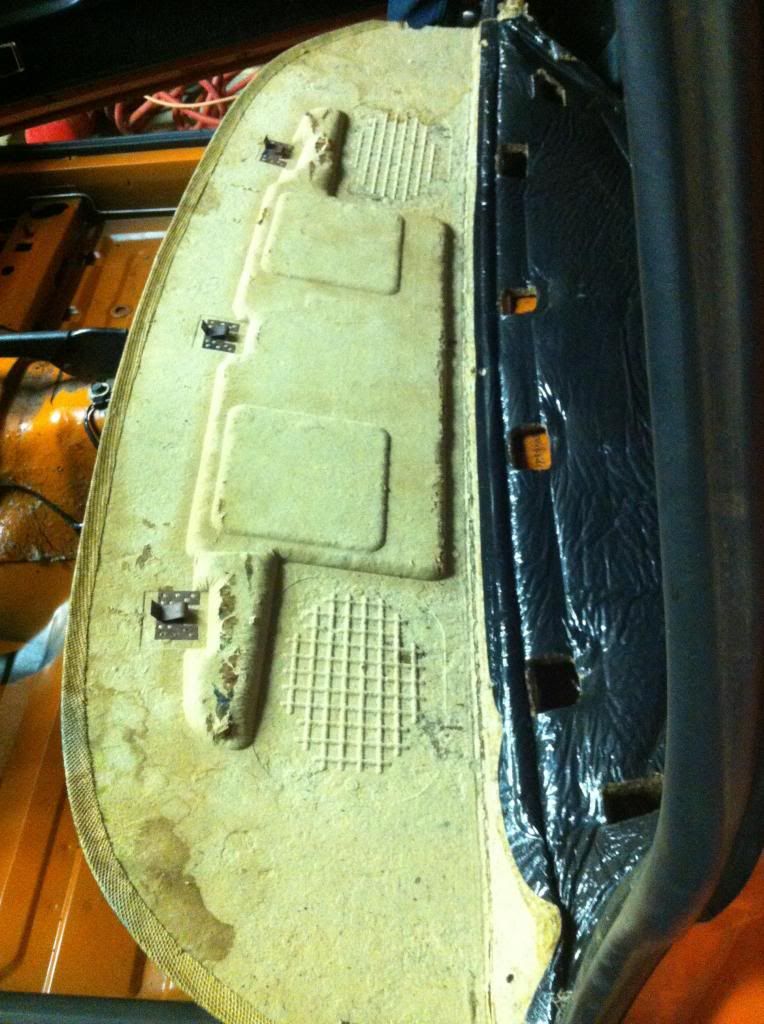
    I know you were still thinking about the package shelf. Did you find anything?

    I showed you the one I redid and the fabric I found. http://vb.foureyedpride.com/showthre...=1#post1671055

    I do not know if yours is the same sisal/fibre mesh as our 79 but this stuff was good enough and the price was right. I have enough left over if you want to use it too. Let me know and I can send some your way.
    I swear you are one of the nicest people. The package tray has been slipping my mind lately. We have a couple of auto interior places in town. I just need to spend the time with them. I hope they have a clue about the fabric. Did the original package tray not have holes in it for speakers? Where they just mounted below? It does look like we have the same material for the tray though.

    Your son's luck with the mustang made me cringe. I'm so glad he's ok. I hurt for my boy just thinking of that. And secondly, I wept for that beautiful car. Thank you for redoing the damage.

    I'm going to save this hood for the drivetrain upgrade. I didn't get to see the underside, so i'm not positive it has the hole in it or not. I might go ahead and get it blasted (the proper way this time) fix it and paint it, then off to storage. Shoot, I don't know. I may wait for the drivetrain upgrade first.

    As far as that goes, I may drop in the 5.0 I've got built for my '86 into it before it's first drive......Thoughts for later.

  2. #552
    FEP Supporter
    82GTforME's Avatar
    Join Date
    Feb 2013
    Location
    Alberta, Canada
    Posts
    4,857

    Default

    Quote Originally Posted by Davedacarpainter View Post
    I swear you are one of the nicest people. The package tray has been slipping my mind lately. We have a couple of auto interior places in town. I just need to spend the time with them. I hope they have a clue about the fabric. Did the original package tray not have holes in it for speakers? Where they just mounted below? It does look like we have the same material for the tray though.

    Your son's luck with the mustang made me cringe. I'm so glad he's ok. I hurt for my boy just thinking of that. And secondly, I wept for that beautiful car. Thank you for redoing the damage.

    I'm going to save this hood for the drivetrain upgrade. I didn't get to see the underside, so i'm not positive it has the hole in it or not. I might go ahead and get it blasted (the proper way this time) fix it and paint it, then off to storage. Shoot, I don't know. I may wait for the drivetrain upgrade first.

    As far as that goes, I may drop in the 5.0 I've got built for my '86 into it before it's first drive......Thoughts for later.
    I went to this place locally that had a large selection of OEM type interior materials looking for headliner vinyl. No luck with that but I asked about mesh and they came up with what I bought. I was discontinued there and was on clearance. They actually called it "bug screen". It appears to be rubberized and have a nylon strand core.

    For our early 79, the package tray had no holes and I had to cut them. The door sticker has no radio but the car had a mono AM radio and the Marti report and build sheet show an AM. I had to cut the holes in the board myself.


    Travis T was actually surprised there were no holes which makes me think they all may have afterwards including yours??
    After I cut the holes in ours, I put some screen over them to protect the black mesh from sagging or something poking through one day.

  3. #553

    Default Reassemble of the Heater Box

    So, I finally reassembled the heater box mostly. I'm still needing to get my new fan motor (tomorrow) and a few clips that have become harder to find over the years, jeez i'm getting old.

    That gasket kit I bought, while having a large amount of the gaskets I needed, didn't have every last thing. I needed to make some foam gaskets for the blower/blend section that hooks up to the main box.Name:  IMG_2869.jpg
Views: 495
Size:  84.6 KB I just used some foam packing from new parts at work and glued them together to make them thick enough.

    I also used that shelving foam to make the foam cover for the side vent/defrost blend door and glued it on.Name:  IMG_2872.jpg
Views: 493
Size:  81.8 KB

    I stapled the defrost vents and the vent/defrost blend section back together. That was fun. As a note to anyone else doing this. put something solid on the backside (like a chunk of wood) of the plastic you're stapling together again. It'll break otherwise.

    So, mainly, it's reassembled. New heater core, a/c condenser, fan resistor, seals, vacuum actuator for the fresh/recirc air. All of the actuators work great and I lubed them lightly with dielectric grease.Name:  IMG_2873.jpg
Views: 488
Size:  78.8 KB

    Notice the snazzy new heater box to firewall gasket made from floor mattes. Name:  IMG_2874.jpg
Views: 486
Size:  82.0 KB

    I need to replace some of the vacuum lines too. Help me here, how do I disconnect the old lines and install new ones into the junction block?Name:  IMG_2875.jpg
Views: 494
Size:  71.8 KB

  4. #554

    Default

    So, a before and after.Name:  IMG_2770.jpg
Views: 487
Size:  90.1 KBName:  IMG_2873.jpg
Views: 482
Size:  78.8 KB

  5. #555
    FEP Super Member JTurbo's Avatar
    Join Date
    Jan 2006
    Location
    Western MA
    Posts
    6,086

    Default

    Looks amazing, great attention to detail. Can't help with the vac hoses, I've never disassembled one....

  6. #556

    Default

    Nice work. Side note, or question. I'm changing mine from non ac to ac. Do you think I'll need to pull the dash to get the box out? Just started fiddling with it tonight. I was looking at one of my parts cars and couldn't help notice all of the black interior is in fantastic condition. I sure like the red but the reality of using it ...... anyhoo. Maybe I change the dash now, but I kinda want to drive it this year not next.

  7. #557

    Default

    Oh, and also, I think the lines are glued in to the connector. If you run a pick around them you should be able to remove them. Not sure about new tubes though. Disclaimer: my experience in more on GM stuff

  8. #558

    Default

    Oh yeah, dash has to come out. The blend box for the side vents sits right in front of the main box and will block it from coming out without removing the dash. Plus the bracing for the main box is located up high on the right side behind the dash, it's bolted to that bracing. Sorry brother.

  9. #559

    Default

    Quote Originally Posted by 2nd chance cobra View Post
    Oh, and also, I think the lines are glued in to the connector. If you run a pick around them you should be able to remove them. Not sure about new tubes though. Disclaimer: my experience in more on GM stuff
    I suppose I could do a little reading tonight in my service manuals......

  10. #560
    FEP Super Member 84StangSVT's Avatar
    Join Date
    Mar 2014
    Location
    Omaha, NE
    Posts
    4,342

    Default

    Quote Originally Posted by Davedacarpainter View Post
    I need to replace some of the vacuum lines too. Help me here, how do I disconnect the old lines and install new ones into the junction block?
    Those are epoxied into the connector IIRC. I have had a few of the hoses pop out over the years and have had decent luck putting them back in with something like Loctite flexible adhesive. Now as for how to intentionally remove and replace the hoses, I'm of no help there.
    Brock
    1984 Mustang LX Convertible 3.8L V-6/Auto (SOLD)
    1984 Mustang GT Hatchback 5.0 V-8/5 Speed

    I'm an FEP Supporter and proud of it. Are you?

  11. #561

    Default

    Thanks Brock. I used a small pick and slid it into the connector. That loosened the main vacuum line and it pulled right out. I've got to go to Oreilly's for my heater fan motor, I might as well get some new vacuum lines while I'm there.

    Btw, I finally stripped the t-top trim and got it painted today. Now I just need to dig out the new seals for it. I also need to get the lock cylinder on the driver's side rekeyed the my new lock set keys.Name:  IMG_2885.jpg
Views: 474
Size:  95.0 KBName:  IMG_2887.jpg
Views: 463
Size:  81.0 KB

  12. #562

    Default

    Here's a better picture of the tops after the bake cycleName:  IMG_2888.jpg
Views: 455
Size:  156.4 KBName:  IMG_2892.jpg
Views: 457
Size:  77.6 KBI love how they turned out.

    I also mostly reassembled the instrument panel too. I decided to just knock off the worst of the rust. I'm too paranoid about future grounding issues (like when I finish bolting everything back together and not have something work). So it's not a stunning frame, but who's gonna see it? No concours judging on this car. Name:  IMG_2893.jpg
Views: 441
Size:  92.5 KB

    Im still waiting on getting my GT hood. I was going to pick it up tonight but God decided to send a hail storm through here right at 5:00. Funny, the guy didn't want to pull the hood in the hail. I'm also waiting to get my heater blower motor and a few hard to find clips to finish the heater box, tomorrow looks promising for all of this stuff though.

  13. #563

    Default Hood Scoop

    I got my hood scoop this morning. I was going to get the hood as well, but it had a hole rotted through it underneath the scoop. So I stripped it and primered it today. Tomorrow I'm going to make it so I can two sided tape it to my current hood.Name:  IMG_2894.jpg
Views: 421
Size:  61.8 KBName:  IMG_2897.jpg
Views: 424
Size:  65.8 KBName:  IMG_2896.jpg
Views: 420
Size:  73.3 KBI'll block it Friday and reprimer. Maybe paint it Monday.

    i also glued the seals on the t-tops, tomorrow I will hopefully put them together and take them to storage.

  14. #564

    Default

    I've decided that I won't drill holes in my hood to mount the scoop to it. I will two sided tape it. As you know, the edges are too thin to attach the tape to with any hope of keeping the scoop on the car when driving. I took the studs out and thickened the edges. I sanded the area with 40 grit sandpaper and made a make shift mold that I filled with Panel Bonding Adhesive. Of course I used plastic adhesion promoter first. Once it hardened, I blocked it even with the edge. I wanted it even so the two sided tape would hold it slightly above the hood. I don't want to rub that pretty new paint on the hood.Name:  IMG_2899.jpg
Views: 375
Size:  88.3 KB

    After that, I blocked the top side with 150 grit sandpaper and was able to block out the small waves where the stud post are located. I had one deeper chip that i attempted to block out. It was too deep so I filled it with Polyflex. Not much, but enough. I reprimered it and blocked it with 320, then 600 and finally with 800. Then I painted it the trim grey and sprayed the same satin clear I used on the center of the hood.Name:  IMG_2907.jpg
Views: 374
Size:  48.6 KBName:  IMG_2908.jpg
Views: 374
Size:  70.2 KB

    I also cleaned up the trim panel that goes on the right side of the instrument panel. The wood grain had, what I thought, some bad staining on it. I took some rubbing compound and a microfiber towel and rubbed over it by hand. It all cleaned off and really looks as good as new. I used a silver sharpie to re highlight the edges of the vents too. Turned out nice, huh?Name:  IMG_2902.jpg
Views: 374
Size:  106.1 KB

    I started to put the t-tops together, and was about finished when I realized I forgot to glue in the new seals on the trim panel. I got that glued on and will finish off the tops on monday.Name:  IMG_2909.jpg
Views: 371
Size:  71.0 KB

  15. #565
    FEP Supporter
    82GTforME's Avatar
    Join Date
    Feb 2013
    Location
    Alberta, Canada
    Posts
    4,857

    Default

    Looks great Dave.

    You get a lot done over a week! The dash panel looks perfect too. The silver Sharpie to the rescue again! I wish someone would do a step by step on using that stick on chrome foil that is out there to see a comparison. I've heard it mentioned but I don't recall seeing it installed.
    Quote Originally Posted by Travis T View Post
    I think this is my favorite car on the site right now.
    Quote Originally Posted by BLUECRAPI
    This is the best thread on the internet.
    Darran
    1982-1C (Black) GT T-Top:http://vb.foureyedpride.com/showthre...he-Road-Thread
    1986-9L (Oxford White) SVO: http://vb.foureyedpride.com/showthre...d-did-1986-SVO
    1979 (85:Tangerine) Coupe (my son's): http://vb.foureyedpride.com/showthre...gerine-Machine
    1979 (3F:Light Medium Blue) Coupe (one day to be my other son's!) http://vb.foureyedpride.com/showthre...um-Blue-Bomber!

  16. #566

    Default

    Thanks Darran.

    Honestly I think the sharpie is closer to the original than the chrome would be.

  17. #567

    Default More Little Crap

    I hope y'all don't mind all of the posts with little crap like this. I want to make it so anyone else doing the same thing can have an idea on what I did.

    There are soft foam seals that seal between the different sections of the heater box. They aren't in terrible shape, but they do smell like old mouldy rat crap.

    So I went to Hobby Lobby and bought some 1" foam sheets.Name:  IMG_0519.jpg
Views: 338
Size:  89.9 KB

    I used the old pieces for templates and cut them out with a razor. I'll use two sided tape to stick them to their correct places on the box.
    Name:  IMG_0520.jpg
Views: 343
Size:  77.5 KB
    I also bought a roll of thin foam to make the foam seals that surround the vents where they slide into the plastic ducting.
    Name:  IMG_0521.jpg
Views: 338
Size:  86.8 KB

  18. #568

    Default

    I also want to thank Jon (jlehma13) for selling me this little jewel for my steering wheel! Woohoo! I'll disassemble it, takes some finger nail polish and redo the red, white, and blue crest. I'll sand down the cover and clearcoat it like I did with my taillights. Hopefully it will look brand new when I'm done with it. These are kind of tough to find!Name:  IMG_2910.jpg
Views: 354
Size:  52.6 KB

  19. #569

    Default

    Such great attention to detail. Wish I had the skill and patience!

  20. #570

    Default

    I could be a hand model.

  21. #571

    Default

    Quote Originally Posted by jlehma13 View Post
    I could be a hand model.
    You could, you should pursue that.....

  22. #572
    FEP Power Member dagenham's Avatar
    Join Date
    Jul 2016
    Location
    Duncannon PA
    Posts
    1,047

    Default

    Quote Originally Posted by Davedacarpainter View Post
    I also want to thank Jon (jlehma13) for selling me this little jewel for my steering wheel! Woohoo! I'll disassemble it, takes some finger nail polish and redo the red, white, and blue crest. I'll sand down the cover and clearcoat it like I did with my taillights. Hopefully it will look brand new when I'm done with it. These are kind of tough to find!Name:  IMG_2910.jpg
Views: 354
Size:  52.6 KB
    How will you disassemble the emblem? With heat?

  23. #573

    Default

    Not sure yet, when I get it, I'll post how I did it.

  24. #574

    Default Heater Box

    Well, I got my new heater blower. So I put it back together and put it in the box. I tested it out with my jumper box and it's so quite. Jeez it works good though. I soldered on the old connector, stuck on my new foam seals and it's done! Woohoo!Name:  IMG_2912.jpg
Views: 275
Size:  74.6 KB
    So, like so much stuff before, it went into one of the parts piles that I seem to have stashed all over the place these days.Name:  IMG_2913.jpg
Views: 277
Size:  93.7 KB

  25. #575
    FEP Super Member 84StangSVT's Avatar
    Join Date
    Mar 2014
    Location
    Omaha, NE
    Posts
    4,342

    Default

    Quote Originally Posted by jlehma13 View Post
    I could be a hand model.


    QVC should be calling any minute now.
    Brock
    1984 Mustang LX Convertible 3.8L V-6/Auto (SOLD)
    1984 Mustang GT Hatchback 5.0 V-8/5 Speed

    I'm an FEP Supporter and proud of it. Are you?

Page 23 of 61 FirstFirst ... 13212223242533 ... LastLast

Posting Permissions

  • You may not post new threads
  • You may not post replies
  • You may not post attachments
  • You may not edit your posts
  •