Close


Page 19 of 56 FirstFirst ... 9171819202129 ... LastLast
Results 451 to 475 of 1376
  1. #451
    Mike1157
    Guest

    Default

    Quote Originally Posted by tiretread View Post
    Love the tank set up. I've been looking at doing the same myself.

    Effin bug! lol. I'm still here and following every post. This is good stuff to be reading when you can't work on your cars.
    Thank you sir, yeah you can see that that bug ruined a perfect finish. But again the only way that will be seen is to fold the driver seat forward.

    Who knows, in a million years some archaeologist may uncover the console, and they may be able to scrape enough of the upper layers of paint to expose him, and bring him back to life. Then he can buzz around for the rest of his normal life (all 20 days worth) in the future.

    I may have just did that bug a favor by sealing hiss ass under a coat of plastic.

  2. #452
    Mike1157
    Guest

    Default

    Ok,

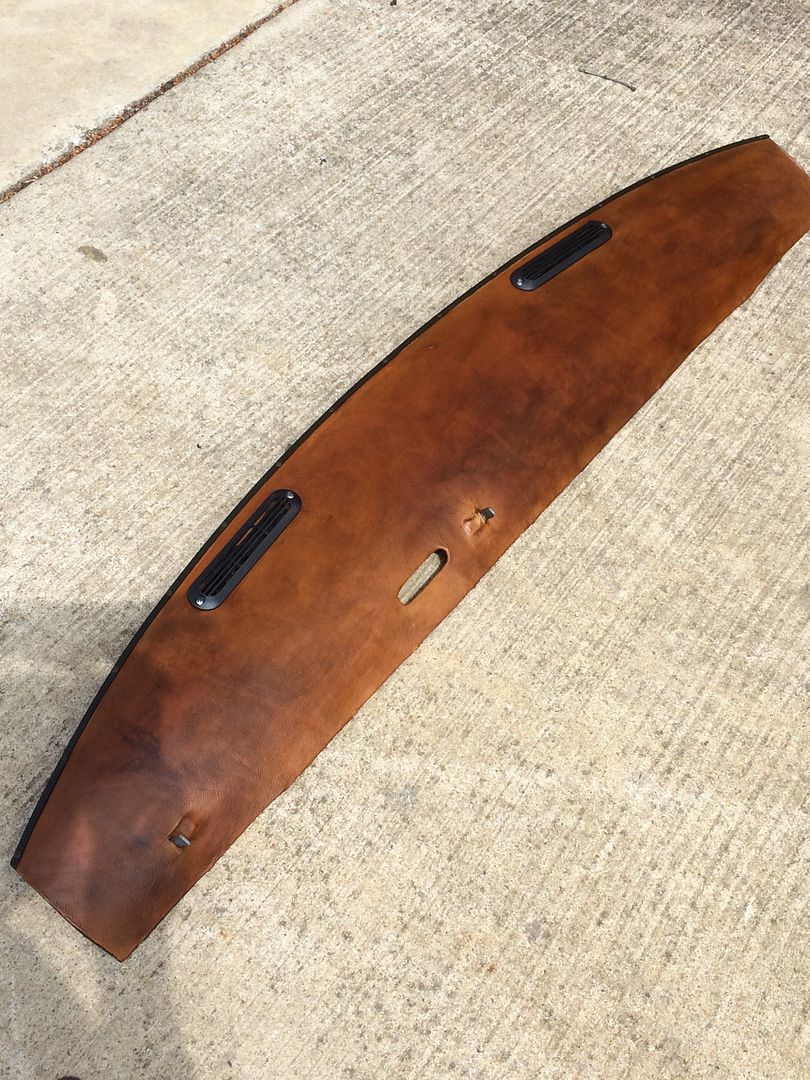
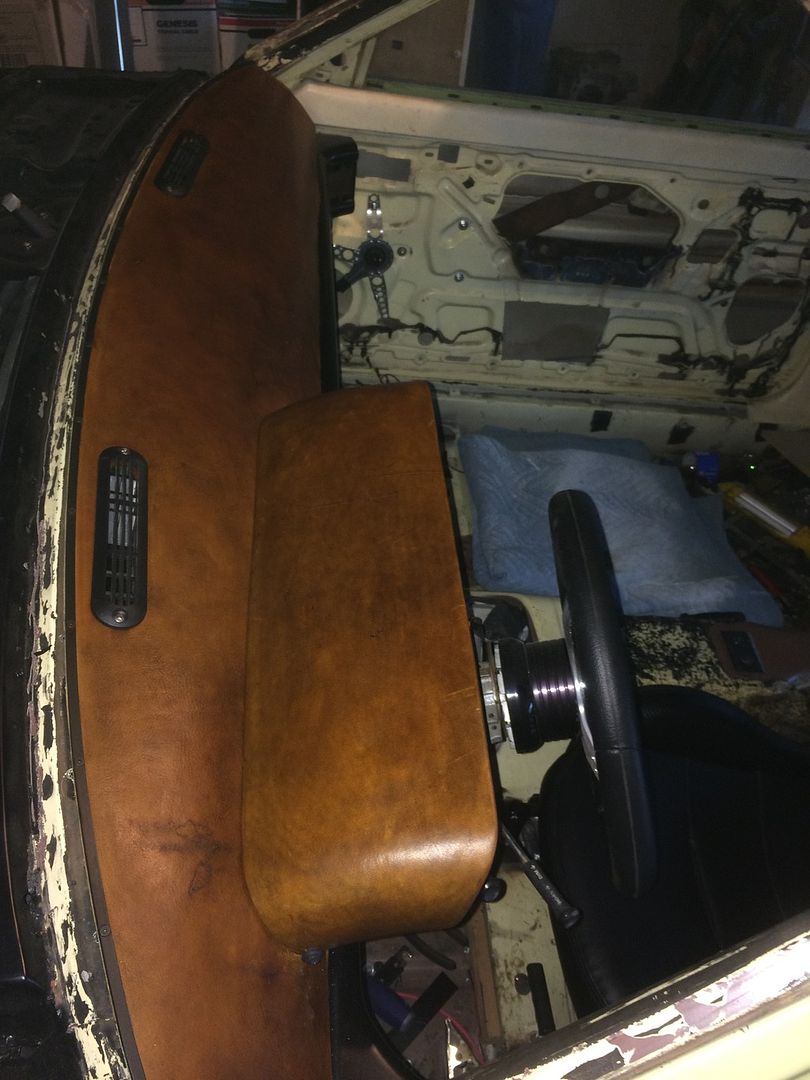
    I'm gonna ask for an opinion right up front. The dash top if you'll remember has a stain where I tried to remove some spray glue, and ended up pretty well trashing the thing. In an attempt to save it, I went back to my leather guy and he sold me this junk called "antiquing gel" It is supposed to make natural finish leather look old. Works like a stain, you blot that junk on w/ a rag, work it into the leather grain, the leather takes what it wants, and you wipe off the rest. Kinda like what happens to a saddle, or old chair after it has years of oil from contacting the skin.

    By itself, I think the dash doesn't look all that good


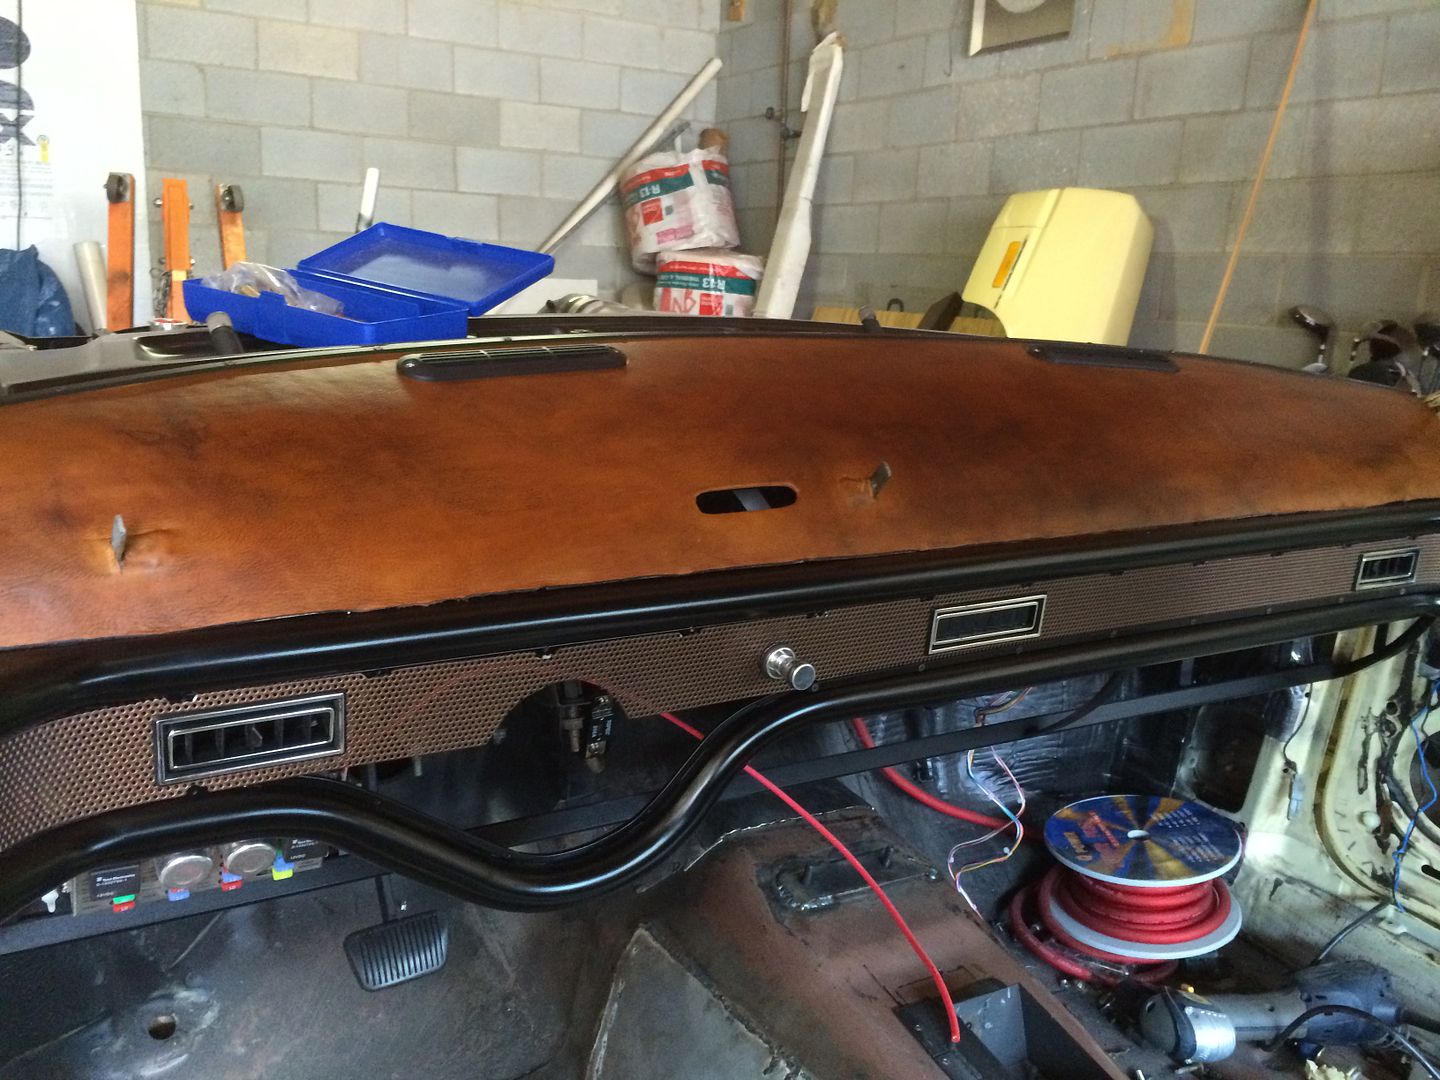
    But take that, and set it on top of the dash frame, and it changes a bit.


    I'm kinda conflicted, because if I do it to the dash top, I gotta do it everywhere else. (there really isn't that much the bottom three pieces, and the two door panels) On one hand, I like the lighter color, but I'd still have to seal that in some way, and doing so will darken it anyway. How that process will differ from the staining method, I don't know (it may not be any different at all). I don't know if the antiquing thing has effectively fixed the stain problem, It just made "more stains".

    The grill mesh is actually a coppery metallic bronze. Matches the carpet almost perfectly. That is one thing that I'm really happy with. The top trim piece isn't pictured, because like I always do, I try to handle a painted surface to soon, and I put my finger prints all over the thing. So that is off hanging in the garage waiting on paint to dry.

    So whad'ya think? antique or go with the natural finish, that has been sealed?

  3. #453
    FEP Super Member Travis T's Avatar
    Join Date
    Jan 2011
    Location
    China Grove, North Carolina
    Posts
    5,267

    Default

    I think what you have done to the leather on the dash looks really good myself.
    1984 Mustang GT owned since 1991 (first car). Mercury Mountaineer GT-40P engine, some suspension mods, currently undergoing a five lug SN95 brake upgrade and more suspension mods. Some minor body and interior mods have been done as well.

    2004 GT convertible, 2001 Taurus LX, 1994 F150, 1950 F-1 Ford Pickup

  4. #454

    Default

    If you ask me, I think the dash now looks "cowboy". If your theme is essentially Harley Davidson, this now conflicts with that.

    Whether that's true or not, I really liked the lighter color. It looks more "high end" to me, and this build is all "high end". I don't think you want your dash looking used and worn.

    Just my 2 cents.
    Brad

    '79 Mercury Zephyr ES 5.0L GT40 EFI, T-5
    '17 Ford Focus ST
    '14 Ford Fusion SE Manual

  5. #455

    Default

    I like the way it looks in the above picture. I think it looks rich and beautiful (for the lack of a better word). If it was me, that's what I would go with. Lighter tan just doesn't do it for me as much as the darker, aged look.
    Cheers!

    Mike (TopGear85)


    Have:
    85 Saleen #73-GT,2R,TuTone,Cruise,Pos,5spd,Charcoal
    ***August 2015 ROTM Winner!***

    Had:
    79PC-San Jose #2890
    86GT-9L,TuTone,5spd,T-Tops,Sand Beige
    86GT-9L,TuTone,5spd,T-Tops,Charcoal
    90LX-Oxford Wht,5spd,Sunroof,5.0 Hatchback
    90GT-Oxford Wht,5spd

  6. #456
    FEP Super Member mustangxtreme's Avatar
    Join Date
    Feb 2009
    Location
    Snohomish, Wa
    Posts
    4,021

    Default

    Mike, I think the dash looks great. It adds some warmth to the interior.
    Dave

    If common sense was common wouldn't it just be sense?

    1983 Capri L T top 5.0 efi aod
    1983 Capri RS Turbo
    1981 Black Magic 400 c6
    93 F-250 351 5sp 4x4

  7. #457

    Default

    Dash looks great. Even better in the car. I think you got it nailed.

  8. #458

    Default

    I like the darker look. It might also help cover up future spills or damage to the dash.

    Jess
    Previously owned;
    1979 Mustang, v6 swapped to EFI 393, custom installed m122 blower, 4r70w trans, Megasquirt II, T-top swaped in.
    1990 Mustang, 545 BBF, C-4 with brake, ladder bars.
    1983 Mustang, 1984 SVO Mustang
    1984 Mustang convertible, v6 swapped to 351
    1986 Mustang GT, 1989 Mustang GT convertible
    1992 Mustang coupe, 4 swapped to 302

  9. #459
    Mike1157
    Guest

    Default

    Well, between this forum, and the other one I haunt, the antiqued effect "wins" I guess.

    I do agree w/ Brad though, the antiqued look isn't what I originally envisioned for this car. I liken the aged effect not so much as "cowboy" but more like "tea and crumpets". In other words, the effect looks more at home in a Rolls Royce Silver Cloud, as opposed to an Aston Martin DB9.

    The saving grace with using the effect is, the aged look is dramatically offset by the stark contemporary of the bars, and grille mesh. When the gauge pod (Winkin'), and the underpod (Blinkin') get installed then that will be even more so. Nothing says cold, sterile, and contemporary quite like a red digital display backdropped in smoked black lexan.

    I did get a great recommendation from another guy on the other forum, and I will definitely use it. He suggested that I "brand" the car's name "Cyclone" in the Ford specific font on the door panels. I will do that, I just gotta get the font cut from like 1/8" plate by somebody w/ a water jet. All of that depends on what that would cost obviously, (I'm not that in love w/ it that I'd be willing to dump 300.00 into it so I could "brand" my dead cow hide).

    I should get Winkin' & Blinkin' back from the upholsterer this week, and when I do, I'll stuff them w/ gauges, car audio, HVAC controls and a couple of flush mounted LED's and put them on temporarily so I can start the wiring.
    Last edited by Mike1157; 03-28-2015 at 09:34 AM.

  10. #460
    FEP Supporter
    82GTforME's Avatar
    Join Date
    Feb 2013
    Location
    Alberta, Canada
    Posts
    4,857

    Default

    As much as I would have liked to see the natural leather side by side with the "antiqued" one to compare the look more closely, I think the latter looks pretty good. I think it compliments the paint on the mesh nicely, which once the interior is all in will be tres fantastique! It will look good with your "burnt orange" paint too as it has a nice reddy brown tone to it!

    You know what "bugs" me? Careful planning so everything is right and then S*** happening. Bugs in paint and glue on leather!
    Quote Originally Posted by Travis T View Post
    I think this is my favorite car on the site right now.
    Quote Originally Posted by BLUECRAPI
    This is the best thread on the internet.
    Darran
    1982-1C (Black) GT T-Top:http://vb.foureyedpride.com/showthre...he-Road-Thread
    1986-9L (Oxford White) SVO: http://vb.foureyedpride.com/showthre...d-did-1986-SVO
    1979 (85:Tangerine) Coupe (my son's): http://vb.foureyedpride.com/showthre...gerine-Machine
    1979 (3F:Light Medium Blue) Coupe (one day to be my other son's!) http://vb.foureyedpride.com/showthre...um-Blue-Bomber!

  11. #461
    FEP Super Member 84StangSVT's Avatar
    Join Date
    Mar 2014
    Location
    Omaha, NE
    Posts
    4,342

    Default

    I might be the odd one out but I liked the lighter colored dash over the antiqued look. I guess maybe that is because I grew up in a small town and worked the farms plenty and I still have nightmares of cleaning and conditioning horse saddles and other leather items.

    Either way though, this car is an awesome display of craftsmanship.
    Brock
    1984 Mustang LX Convertible 3.8L V-6/Auto (SOLD)
    1984 Mustang GT Hatchback 5.0 V-8/5 Speed

    I'm an FEP Supporter and proud of it. Are you?

  12. #462
    Mike1157
    Guest

    Default

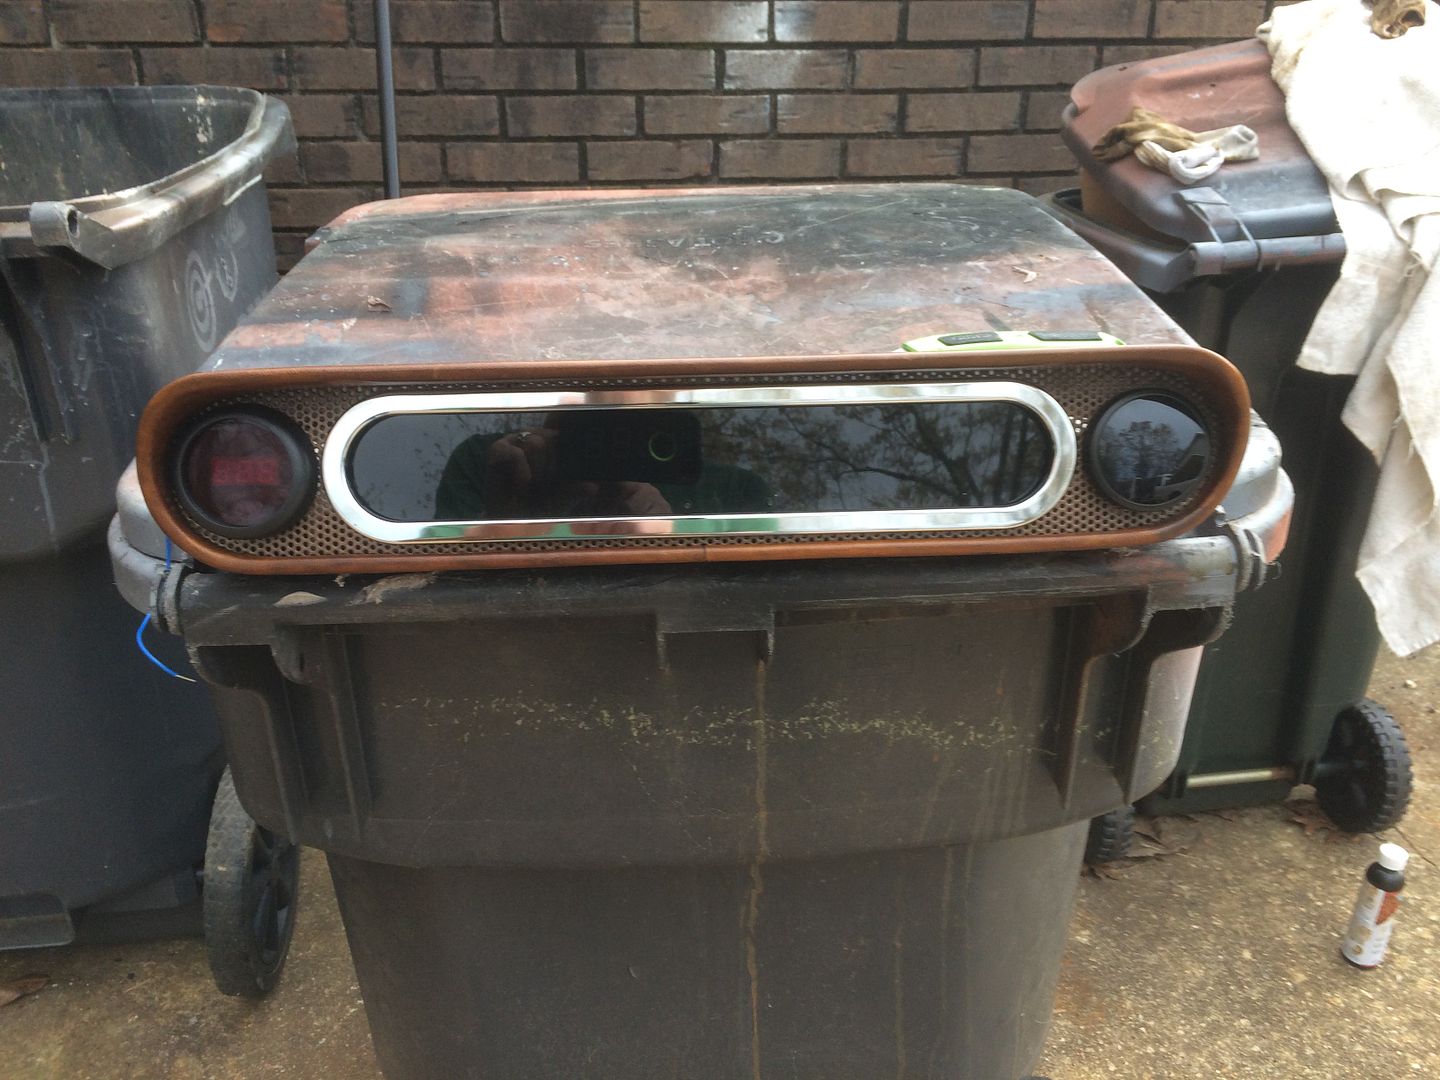
    I get the call today from the trim shop that had Winkin & Blinkin telling me that they were done. When I got home I went straight there and picked them up. After giving both of them the same aging process that the rest of the dash now had, I fill them with the stuff that I've had stashed in boxes for almost two years now.

    First lets talk about Winkin.


    I'm not real happy about this.

    I bought the Summit digital gauge panel first. That thing only cost 250.00 and includes a fuel level, oil press, temp, volts, tach, speedo, R&L TS indicators, and a high beam indicator. It comes with all the senders, and it was just too good a deal to pass up. Next I bought the Innovate LC-1 wideband. The thing only had a black bezel, which at the time seemed like NBD, as I wanted all the dash gauges trimmed in black. The last thing I bought was a Cyberyne digital boost ga. Not alot of digital boost gauges as far as selection goes that have red displays, and I chose that one for that reason. The Summit trim bezel is chrome, the Cyberdyne ga, comes with both, and the Innovate only comes in black. Since they didn't match, I decided to tone down the two out side gauges, by keeping them black, and highlight the digital long gauge and use the chrome bezel instead. All for naught.

    All of this is me trying to justify the fact that the gauges don't match. Since this is just a mock up, nothing is permanent. If I change anything it will probably be the Innovate gauge. I'll try to find a Cyberdyne AFR ga that'll work w/ the wideband. Then I'll use the chrome bezels across the board. Gotta say I'm not real warm and fuzzy about the looks, but since all this junk is new they're what's gonna get used.

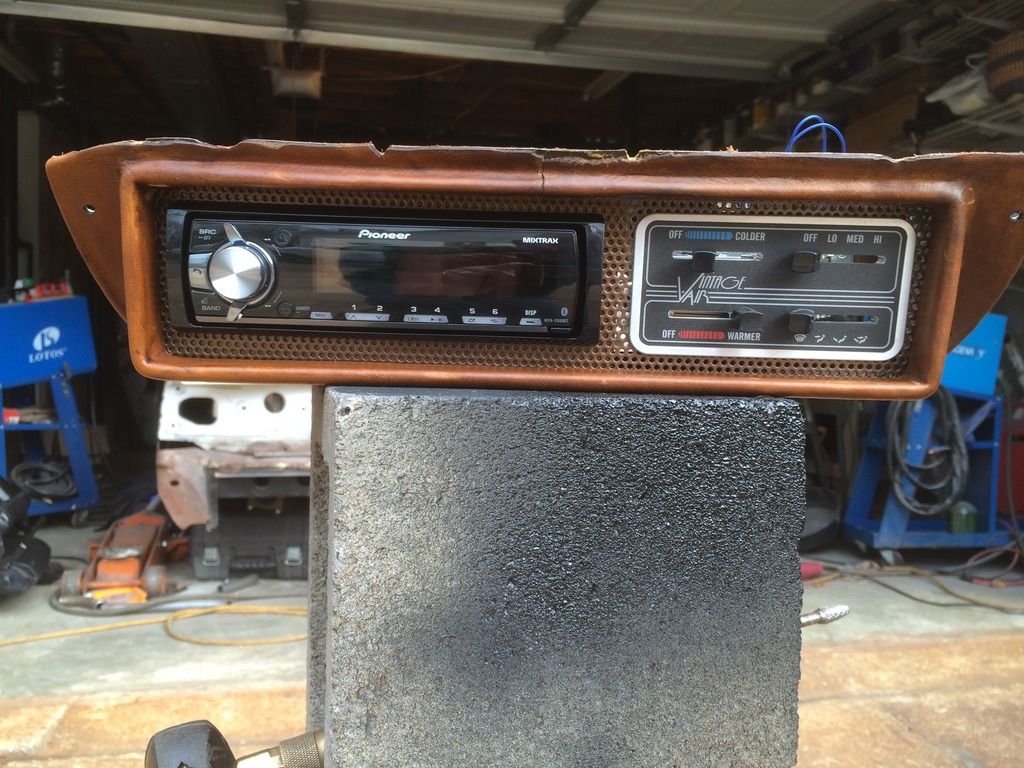
    As for Blinkin, no real drama, except I expected the head unit to be silver. Instead, I got a black one. Again, doesn't match the Vintage Air HVAC control (which probably came in black)


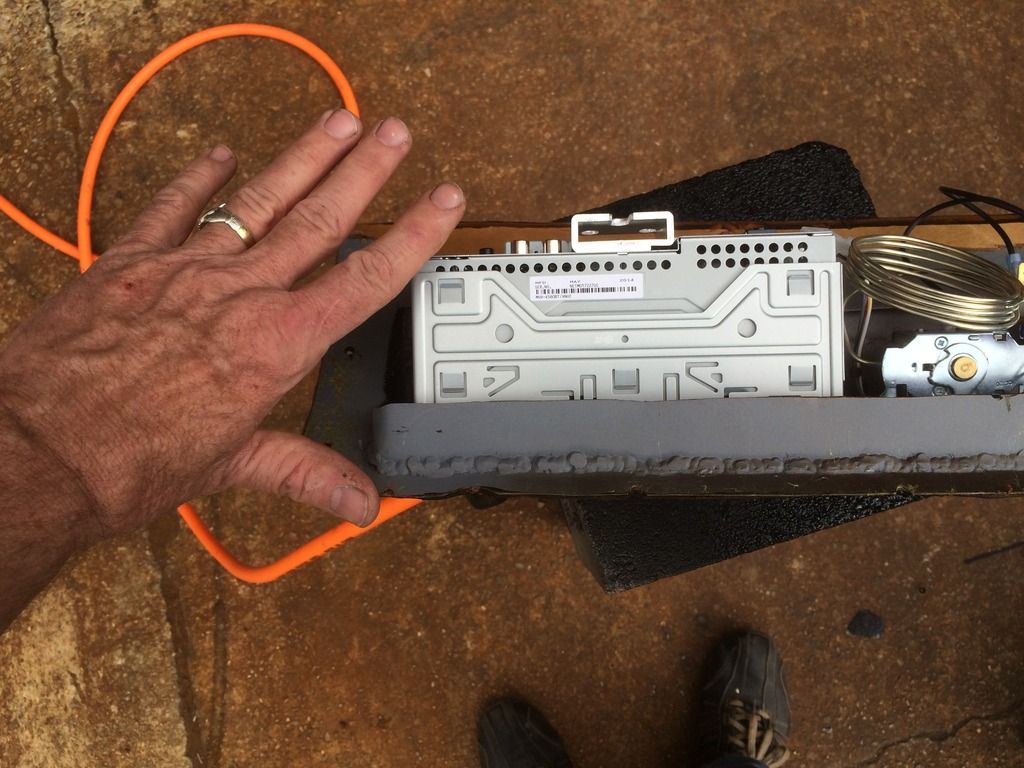
    One thing worth pointing out is that this head unit has no CD player. it is 100% for streaming, bluetooth, or flash drive stored media. Just the thing for somebody like me w/ a smart phone, and a Bagillion songs on Spotify. The fact that it doesn't have an internal CD makes for a very light, very short chassis.


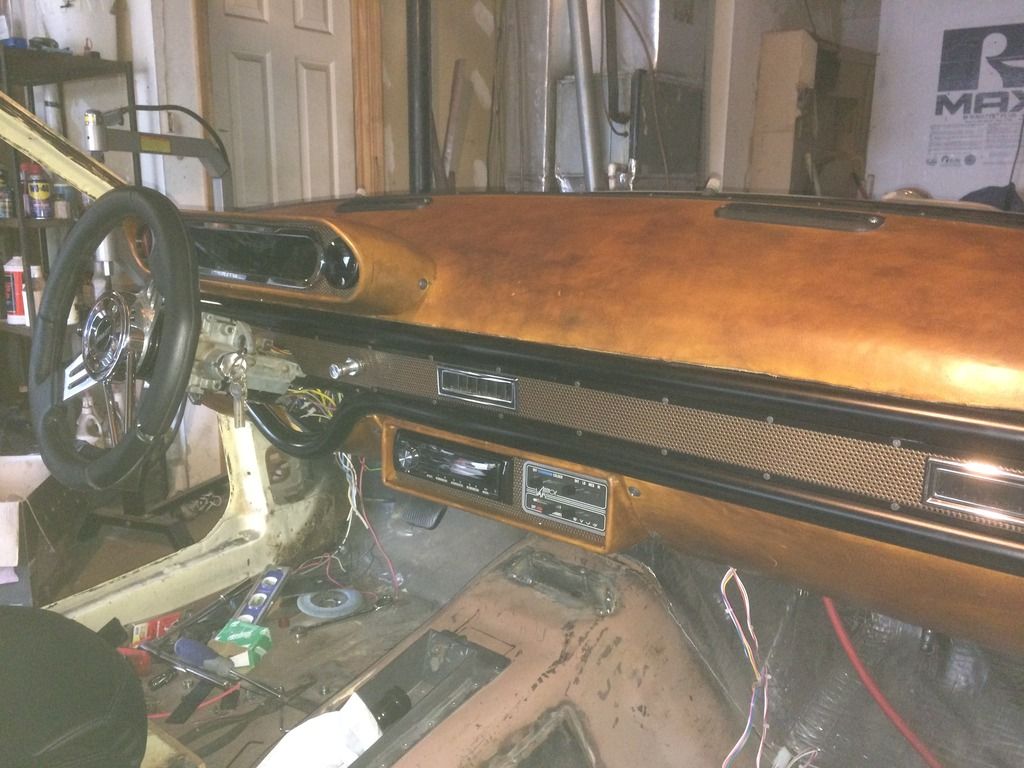
    So I got this stuff, and it's not a real big deal to run a couple of screws to stick it in place, so I figure what the hell.

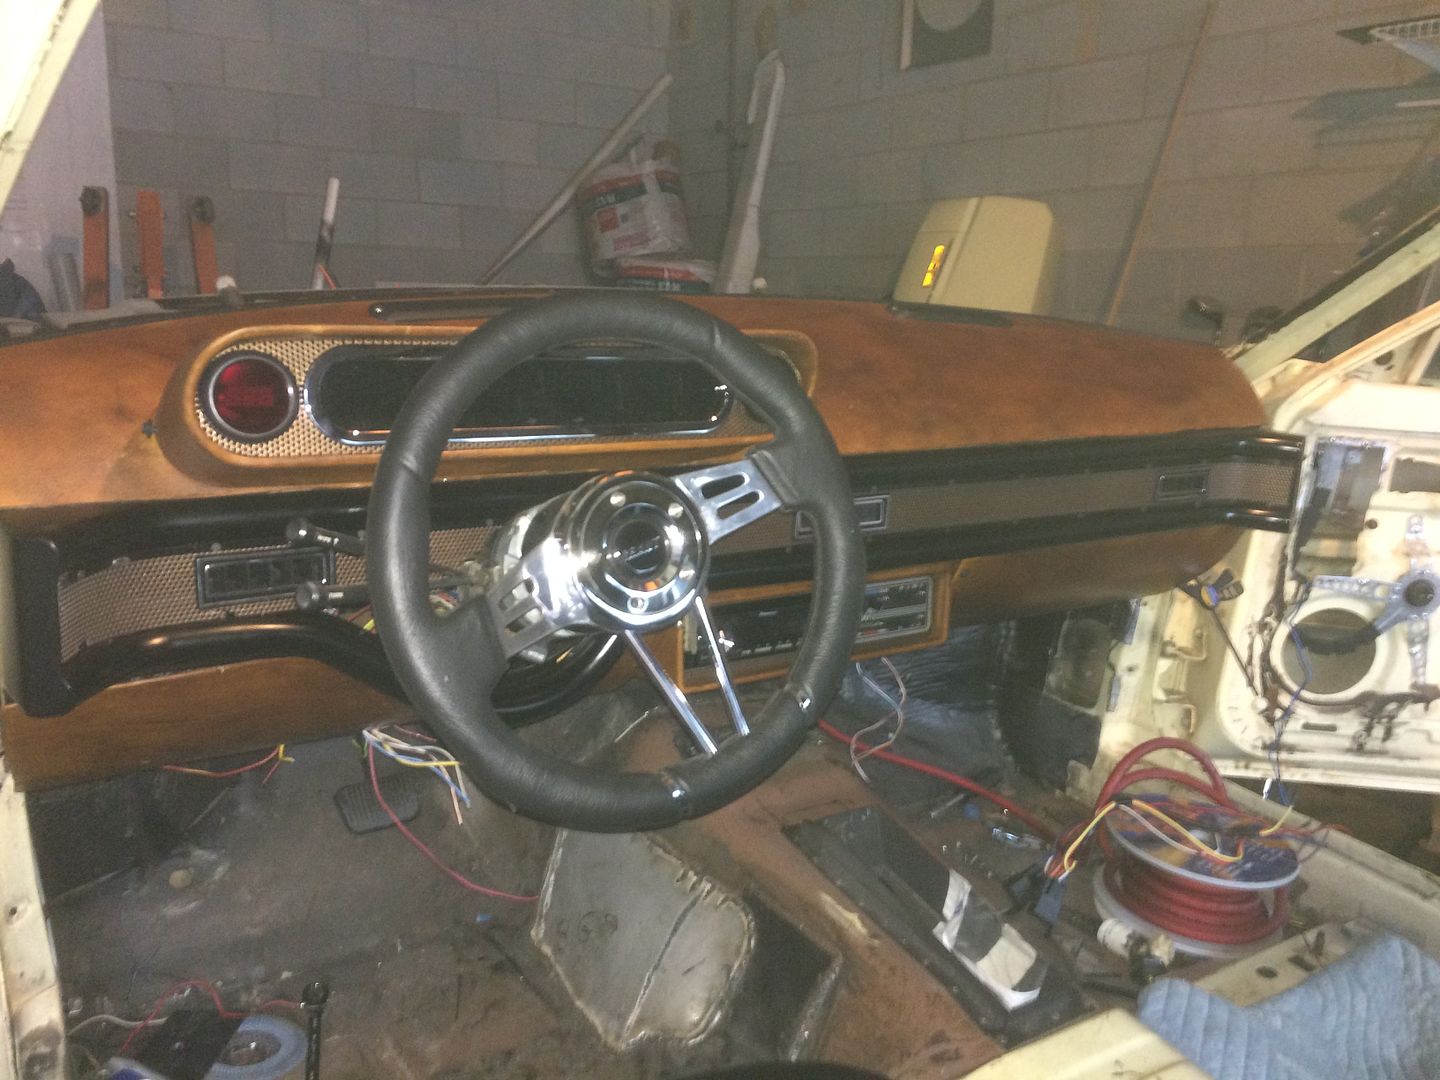
    Let's say this is the 80% money shot.


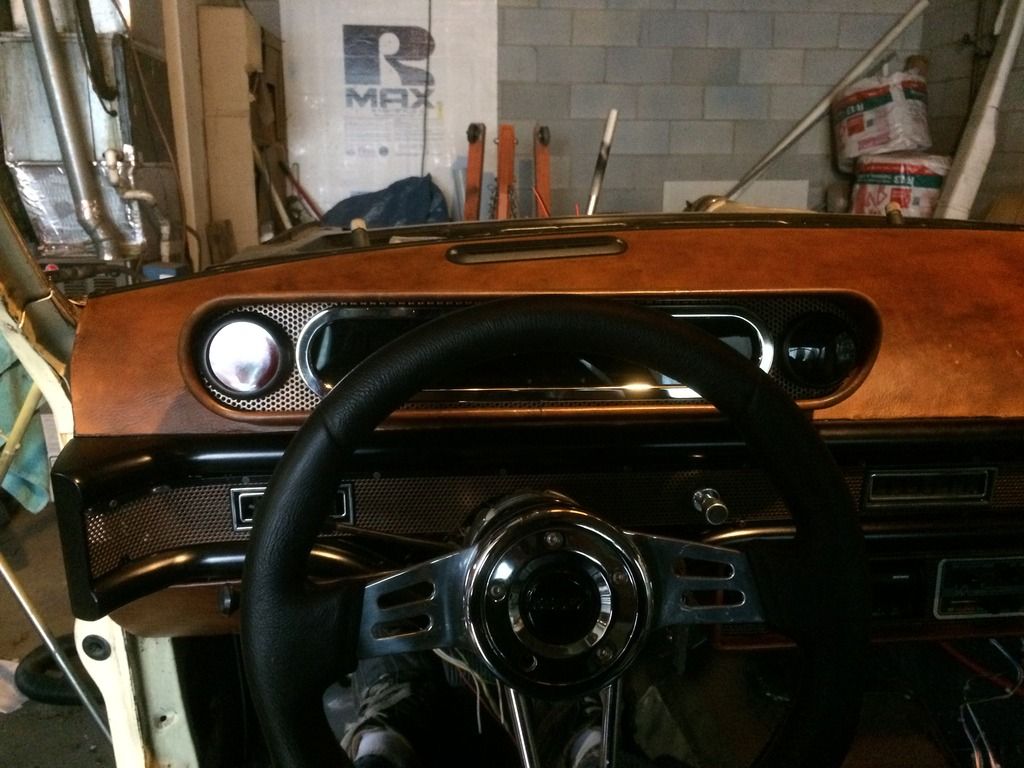
    But, with the good (if any of it is even good) comes the bad. I thought that I had solved the view angle issue by lowering the gauge pod, but clearly I didn't.


    It doesn't matter whether I lower the column, or raise it, the fact that the gauge pod itself is so long, the steering wheel blocks the outside gauges (probably gonna be the gas gauge on one side, and volts on the other). Tach and speedo are in the center.

    I don't know what to do to solve that. Only thing that comes to mind is rebuilding Winkin, and recessing him way into the dash, cause the only way the view angle is gonna allow the full view of that cluster is if it's a mile in front of me.

    (personally, I think I like it the way it is)

    The fit is pretty decent though, and looking down through the windshield ( If there was a windshield) it looks pretty good too.


    So, it'll all come back off tomorrow. I've started wiring the thing, and that'll be the task at hand until I get to the part where I turn the key. in about a month.
    Last edited by Mike1157; 03-31-2015 at 06:51 PM.

  13. #463

    Default

    Wow, that really is a work of art. I love the aging you did with the leather, that really looks amazing. I can't think of anything else to say besides beautiful.
    Cheers!

    Mike (TopGear85)


    Have:
    85 Saleen #73-GT,2R,TuTone,Cruise,Pos,5spd,Charcoal
    ***August 2015 ROTM Winner!***

    Had:
    79PC-San Jose #2890
    86GT-9L,TuTone,5spd,T-Tops,Sand Beige
    86GT-9L,TuTone,5spd,T-Tops,Charcoal
    90LX-Oxford Wht,5spd,Sunroof,5.0 Hatchback
    90GT-Oxford Wht,5spd

  14. #464

    Default

    What about a different steering wheel? Maybe something with a thinner grip would block the gauges less.

    Jess
    Previously owned;
    1979 Mustang, v6 swapped to EFI 393, custom installed m122 blower, 4r70w trans, Megasquirt II, T-top swaped in.
    1990 Mustang, 545 BBF, C-4 with brake, ladder bars.
    1983 Mustang, 1984 SVO Mustang
    1984 Mustang convertible, v6 swapped to 351
    1986 Mustang GT, 1989 Mustang GT convertible
    1992 Mustang coupe, 4 swapped to 302

  15. #465
    FEP Super Member mustangxtreme's Avatar
    Join Date
    Feb 2009
    Location
    Snohomish, Wa
    Posts
    4,021

    Default

    If it wasn't for the HVAC control, I would paint the gauge trim ring black. The chrome doesn't really match with the gold of the mesh. The gauge placement is kind of hard to determine with out sitting in the seat.
    Dave

    If common sense was common wouldn't it just be sense?

    1983 Capri L T top 5.0 efi aod
    1983 Capri RS Turbo
    1981 Black Magic 400 c6
    93 F-250 351 5sp 4x4

  16. #466

    Default

    Agree with mustangextreme about painting the gauge trim ring black. Having said that, this piece (and the rest of the build) is phenomenal. Definitely one of my favorite builds all time. Can't wait to see more.

  17. #467

    Default

    I like the chrome, plus there is chrome surrounding the vents, etc so it all works well together.. I just wish the small circular gauges had chrome circles around them. I would have to return that stereo in favor of a silver one though. I don't think I could live with the black after I expected and wanted silver.
    Cheers!

    Mike (TopGear85)


    Have:
    85 Saleen #73-GT,2R,TuTone,Cruise,Pos,5spd,Charcoal
    ***August 2015 ROTM Winner!***

    Had:
    79PC-San Jose #2890
    86GT-9L,TuTone,5spd,T-Tops,Sand Beige
    86GT-9L,TuTone,5spd,T-Tops,Charcoal
    90LX-Oxford Wht,5spd,Sunroof,5.0 Hatchback
    90GT-Oxford Wht,5spd

  18. #468
    Mike1157
    Guest

    Default

    Quote Originally Posted by TopGear85 View Post
    Wow, that really is a work of art. I love the aging you did with the leather, that really looks amazing. I can't think of anything else to say besides beautiful.
    Quote Originally Posted by Mustang-junky View Post
    What about a different steering wheel? Maybe something with a thinner grip would block the gauges less.

    Jess
    Quote Originally Posted by mustangxtreme View Post
    If it wasn't for the HVAC control, I would paint the gauge trim ring black. The chrome doesn't really match with the gold of the mesh. The gauge placement is kind of hard to determine with out sitting in the seat.
    Quote Originally Posted by tiretread View Post
    Agree with mustangextreme about painting the gauge trim ring black. Having said that, this piece (and the rest of the build) is phenomenal. Definitely one of my favorite builds all time. Can't wait to see more.
    Quote Originally Posted by TopGear85 View Post
    I like the chrome, plus there is chrome surrounding the vents, etc so it all works well together.. I just wish the small circular gauges had chrome circles around them. I would have to return that stereo in favor of a silver one though. I don't think I could live with the black after I expected and wanted silver.
    Thanks for all the input gentlemen, you know I like it.

    Putting pics online is actually a big help to me. I sit there and stare at them, just as I would've had I actually been sitting in the car.

    Based on the staring, THIS is what I've decided to do.

    A different wheel smaller in diameter, and thinner be in the future. I think if I've found something I like, and hopefully that will help solve my view problem.

    As for cosmetic harmony, I'm gonna send the Cyberdyne boost gauge back to summit, and get a different boost ga. that I found online. It's more flat, and more closely matches the Innovate gauge cosmetically. I'm gonna scuff the main gauge trim ring and it's going black as well. If after getting the new boost gauge, I still am not happy, I'll sell the Innovate kit, and get the wideband AFR gauge combo from the same company that sells the boost gauge, and I'll match.

    I've also decided to mask off, and paint that brushed aluminum trim ring on the HVAC control panel black as well. The fact that it's silver not only clashes w/ the head unit sitting right next to it, but it also acknowledges the size difference height-wise between the two. I think if it were black, it would tend to look smaller, and compliment the Pioneer head unit instead of fighting it.

    So that's it for the plan, sending stuff back, and getting different stuff, painting and wiring will make up the next chapter of...... AS THE WALLET BURNS.
    Last edited by Mike1157; 04-01-2015 at 07:58 AM.

  19. #469
    FEP Power Member bridgener's Avatar
    Join Date
    Jun 2008
    Location
    Montreal
    Posts
    1,039
    Brian

    1982 Capri 5.0L
    1965 Fastback project car - more rusty than not

  20. #470
    Mike1157
    Guest

    Default

    While that solves one problem, getting a police officer to inspect, (and pass) that car for licensing with that "wheel"? on it would be another. I'm sure you're joking about it, and the thought of even trying to drive a car w/ two handles just seems like a date w/ a curb to me.

    I actually bought a new "larger" wheel today. Wont be here for a couple of weeks, so I'll have to wait that long to see if I solved the problem.

  21. #471
    FEP Super Member mustangxtreme's Avatar
    Join Date
    Feb 2009
    Location
    Snohomish, Wa
    Posts
    4,021

    Default

    I've also decided to mask off, and paint that brushed aluminum trim ring on the HVAC control panel black as well.
    I was thinking about this as well and I think that should help tie it in with the stereo.
    Dave

    If common sense was common wouldn't it just be sense?

    1983 Capri L T top 5.0 efi aod
    1983 Capri RS Turbo
    1981 Black Magic 400 c6
    93 F-250 351 5sp 4x4

  22. #472

    Default


    If you could put a matte, or even flat, black paint on the 'bezel' surrounding the faceplate, that might tie the head unit in to the HVAC control panel a little more.

    Maybe even a little flat clear over the face plate? I don't know if I'd go that far...
    '88 Mustang GT convertible, T5, 3.08:1 gears. 5.0 Explobra Jet: A9L Mass Air conversion, Fenderwell Mac cold air intake, 70mm MAF meter = 4.6 T-Bird/Cougar housing + '95 Mustang F2VF-12B579-A1A sensor, aftermarket 70mm throttle body and spacer, Explorer intakes, GT40P heads with Alex's Parts springs and drilled for thermactor, Crane F3ZE-6529-AB 1.7 "Cobra" roller rockers, Ford Racing P50 headers, Mac H-pipe, Magnaflow catback, Walbro 190 LPH fuel pump, UPR firewall adjuster and quadrant with Ford OEM cable, 3G conversion ('95 Mustang V6), Taurus fan, rolled on Rustoleum gloss white paint...
    Past Four Eyes: Red well optioned '82 GT 5.0, Black T-top '81 Capri Black Magic 3.3L 4 speed, Black T-top '84 Capri RS 5.0 5 speed.Over 200,000 miles driven in Four Eyes, and over 350,000 in Fox Body cars.

  23. #473
    FEP Power Member Bruce Mohacsy's Avatar
    Join Date
    Jan 2013
    Location
    St.Albert, Alberta, Canada
    Posts
    1,187

    Default

    I'm going to float something here. I totally get the issue with the radio and air unit not matching stylistically. Take heart. Even lotus has problems integrating their "off the shelf" components into their dashes! What if you completely painted over all of the graphics on the vintage air unit with a satin black identical to the stereo? Also painted the mesh background. The idea is to lessen the contrast both surface wise and graphically between the two. Can the face plate be separated from the vintage air unit? Can it be trimmed? If you could remove the face plate from the vintage air unit and the surround ring of the stereo you could create a new face plate that would encompass both units and fit right up to the perimeter of Blinkin. Either have graphics made or do it yourself for the air unit that are in the same style as the head unit. As well you could use a few chrome screws to bolt it all together that match the ones on the dash...........
    Just my 2 cents worth. You've done such an amazing job of creating a completely original dash and integrating all of the design elements that, to me, the off the shelf components just don't play well with the rest of the gauges and the dash.

    BTW. I LOVE the leather on the dash.
    Last edited by Bruce Mohacsy; 04-02-2015 at 08:04 AM.

  24. #474
    FEP Power Member bridgener's Avatar
    Join Date
    Jun 2008
    Location
    Montreal
    Posts
    1,039

    Default

    Quote Originally Posted by Mike1157 View Post
    While that solves one problem, getting a police officer to inspect, (and pass) that car for licensing with that "wheel"? on it would be another. I'm sure you're joking about it, and the thought of even trying to drive a car w/ two handles just seems like a date w/ a curb to me.

    I actually bought a new "larger" wheel today. Wont be here for a couple of weeks, so I'll have to wait that long to see if I solved the problem.
    Haha yeah, I was just kidding. You're not building a batmobile after all.

    I'm really liking the way your dash is turning out. It's got that rich, deep look to it. You'll almost have to drive the car smoking a cuban with a glass of single malt while wearing a monocle it's so classy.
    Brian

    1982 Capri 5.0L
    1965 Fastback project car - more rusty than not

  25. #475
    Mike1157
    Guest

    Default

    Today was my reality check day. One of those days that's there to remind me that I am nothing special. No Artiste, No great fabricator, just some guy w/ dirty hands busting my nuts in the garage trying to work on a stupid car,....and sucking ass while doing it.

    I started today researching, (or trying to research) the proper way to wire the menagerie that is my engine, and the little black boxes that were once a bunch of doo-dads in baggies, that are now supposed to control it.

    Let me just say this about Megasquirt.

    While building the thing (at the time) didn't seem to daunting a task, trying to make sure it was configured properly, and getting a decent wiring schematic to wire up the relay box proved too frustrating to mess with this morning. There is soo much information on that website, trying to find what should be a straight forward answer turned into two hours to find nothing.

    I decided that that was gonna have to wait, besides, I had other things that needed done anyway.

    So I shut off the computer, and went downstairs.

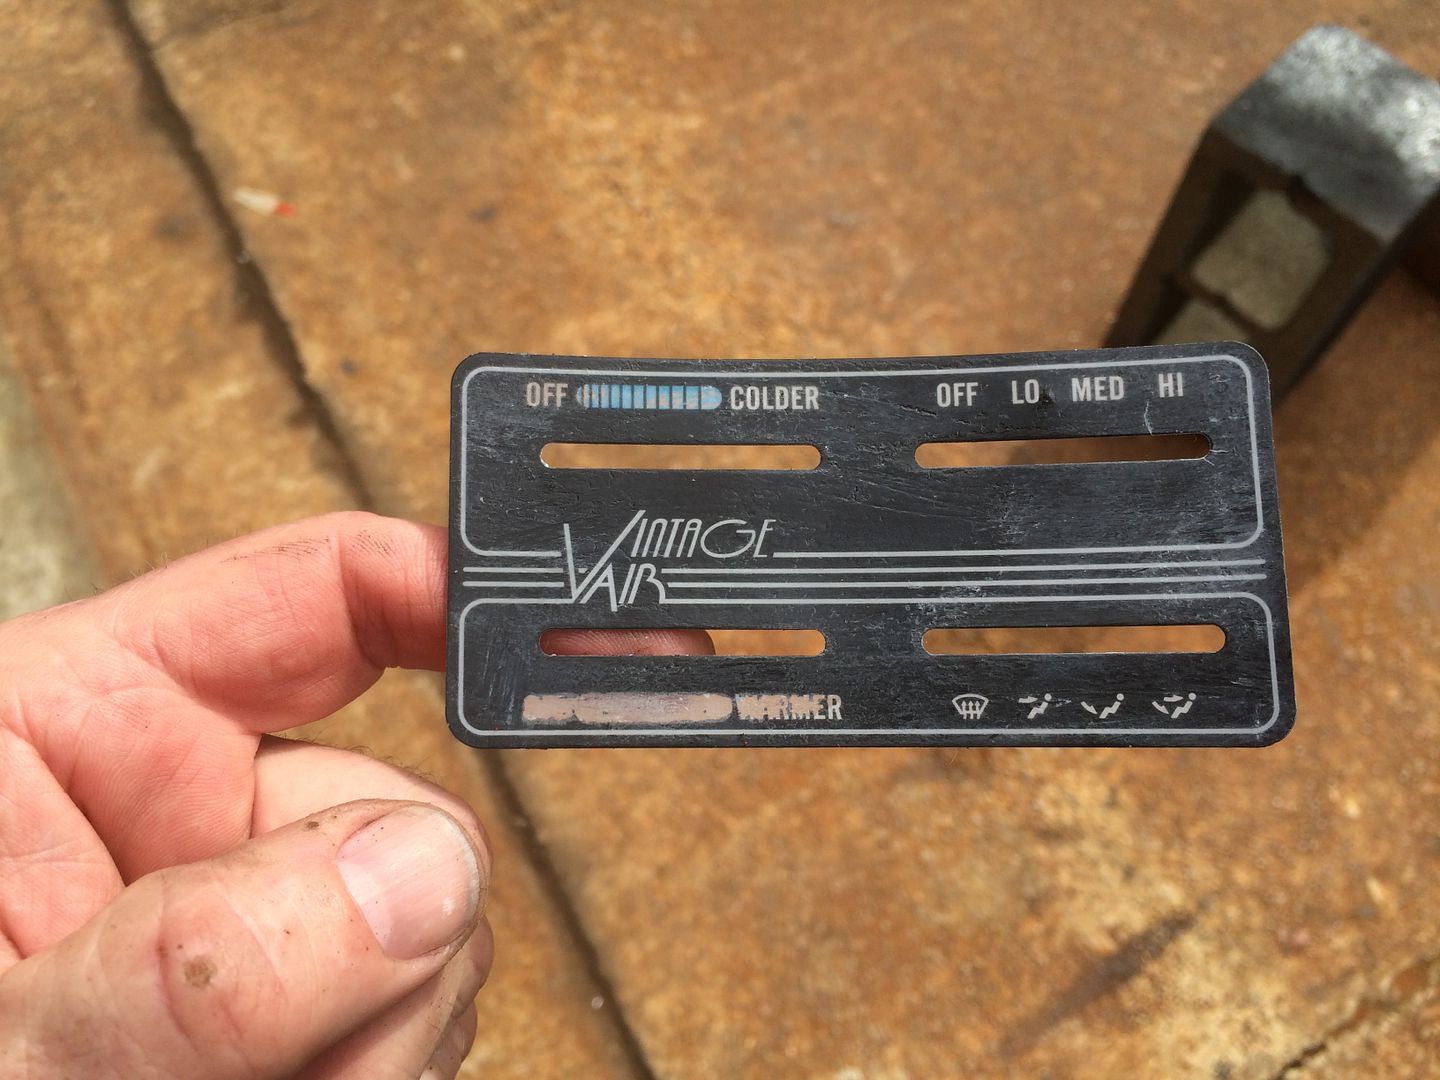
    I said that I was gonna paint the trim ring on the HVAC panel black. For whatever reason, I decided to paint the whole face black. That faceplate is backlit, so I had to mask off the text and icons so as not to paint them. The text and icons were about 1/8' wide (notice I said about). I decided to trim a piece of 1/8" wide pinstripe tape to cover them up.

    This is where Mr. Hack enters the picture.

    You'd think that I've painted enough stuff to know that a piece of wonky tape placed over something, and then painted over will leave a tape line as big as hell.

    For some reason, I chose to ignore that.

    I paint the thing, and as soon as the paint is dry enough I pull the masking off.

    It looks like ass.

    So I get out the lacquer thinner and wipe off the paint, except that cover plate is plastic.

    It melts. I get to looking at the HVAC control itself, and the rheostat that is the temp control is exposed.

    Only now the rheostat is black.

    Bottom line, I ruin the thing. 50.00 worth of garbage now all for the sake of making it more aesthetically pleasing, and more in harmony w/ the head unit.


    I moved the coil off of the valve cover, but up until today hadn't actually moved it. I needed to make a bracket to hold the thing, so I set out to try and redeem myself. The bracket goes together OK, and I get it all mocked up w/ no incident. After the paint is dry I go to mount the thing, and the drill slips off the shooter screw, and dorks up the paint on the inner frame rail. (I get out the black sharpie, reassuring myself that the dink is hidden under the charge tube.


    I get out the special order spark plug wires that I bought from Taylor (6 wires w/ EDIS sockets on one end, and no sparkplug boot on the other. All 5' long)
    Only problem is, I don't know what the order of the coil packs are w/ regard to which one fires what cylinder. I think I know, but I've seen conflicting info out there, and I'm not about to cut up a special order plug wire set until I know for sure which one goes where.

    So I leave it.

    While I'm studying the plug wires, I get to looking at my turbo drain. Hmmm,.....really close to the exhaust. Now I'm worried that that will just melt despite the fact that there is a whole fingers width distance from the tubes it passes. To get a reference as to whether or not that hose will melt, you hold your finger that close to a turbo manifold that just made 20lbs of boost an see how it feels after an hour of sitting there. MELLLTTT.
    I guess I'm looking for some sort of insulating sleeve now.


    I move on.

    This engine uses a on/off idle valve during a cold start.


    This little doo-dad gets 12v from the ECU during a cold start, and opens, which is basically and electrically actuated vacuum leak. The engine speeds up, when it reaches operating temp, the 12v signal is stopped, and lil dude closes, no more vacuum leak. Engine goes back to normal idle speed.

    That was another thing that I mounted today.

    I decided that I would make an EGR block off plate, and drill and tap it for two 1/8"NPT nipples, and attach one of the nipples to my idle valve. Problem is that idle valve cannot see positive pressure (aka boost). So off I go to Auto Zone. I head straight back to the PCV valve section, and proceed to start opening everyone of them that looks like it might work, and blowing in one end, and sucking on the other. Now I know that your thinking that that must've been something to see, this old guy tearing open all of these sealed boxes, and immediately sticking each one in his mouth. I can assure you it was Autozone after all,....nobody saw me, especially not one of the experts behind the counter. After I did the blow/ suck test about ten times, I settled on one. I bought some brass nipples, and headed back home. Once I get there I step up my blow/suck test by blowing regulated air from the compressor through the thing. I stopped testing at 40PSI, cause the thing would just blow off the hose at that point. I guess it'll work.


    There are two holes in the plate. One in front of the throttle blade, and one behind. Obviously I plumbed the line into the one behind the blade. The other end of the idle valve has to go all the way across the engine compartment and is tapped into non-boosted intake air.

    This brings me to my question for any turbo guys that are reading this.

    The other hole is in front of the throttle blade. Is it OK to use that hole to signal the BOV that I just let off of the throttle? I'm pretty sure it is, but I just wanted to check.

    So a whole day. And I mean a WHOLE day. All I managed to do was mount two things, and ruin another. I still have to figure out how to wire the coil packs, and build the plug wires. I've gotta plumb the other end of the idle valve, and if I can use it, run the other pipe nipple to the BOV.

    So I trudge upstairs to do some more research.

    That requires another item to make that process go a little smoother:


    Best damn cookies EVER.
    Last edited by Mike1157; 04-02-2015 at 05:39 PM.

Page 19 of 56 FirstFirst ... 9171819202129 ... LastLast

Tags for this Thread

Posting Permissions

  • You may not post new threads
  • You may not post replies
  • You may not post attachments
  • You may not edit your posts
  •