

On the bright side, they sold me the correct Moog parts for twenty bucks more than the cheap Chassisworks parts. They should have been ninety dollars more. Of course, I still have not finished the job.

On the bright side, they sold me the correct Moog parts for twenty bucks more than the cheap Chassisworks parts. They should have been ninety dollars more. Of course, I still have not finished the job.
1983 Mustang G.T. No-option stripper- I like strippers.
5.0, GT40P heads, Comp Cams XE270HR-12 on 1.6 rockers, TFI spring kit, Weiand 174 blower, Holley 750 mechanical secondarys, Mishimoto radiator, Edelbrock street performer mechanical pump, BBK shortys, T-5 conversion, 8.8 rear, 3.73 gears, carbon fiber clutches, SS Machine lowers, Maximum Motorsport XL subframes, "B" springs.


How hard was it to get the old bushings out? I've got my arms out of my '82 and took them to a shop to get the old out and the new in. They called me later saying they didn't have the right "tool" to get them out. I called another place and they wouldn't install customer supplied parts for warranty reasons. Huh?! Turning down business? Anyways a couple performance shops are up for it for double the "cheaper" places. Am I wise to attempt without a proper press etc.?
BTW, the Energy Suspension bushing kit I bought (4.3132G) has different sized bushings in it. I hadn't really looked closely, but the factory bushings do look to be slightly different diameter.
Thanks.
I wound up doing as several people here told me- I destroyed the rubber on the old bushings with a drill until I could press the steel sleeve out from the center with a screwdriver and hammer, and then collapsed the old steel shell with a hammer and chisel. I DO have a press, and this method was far easier than using the press. To re-install, I used a long piece of threaded rod with two large washers, and screwed the new bushings in- like so-
Obviously, this one is not done yet, but you get the idea.
1983 Mustang G.T. No-option stripper- I like strippers.
5.0, GT40P heads, Comp Cams XE270HR-12 on 1.6 rockers, TFI spring kit, Weiand 174 blower, Holley 750 mechanical secondarys, Mishimoto radiator, Edelbrock street performer mechanical pump, BBK shortys, T-5 conversion, 8.8 rear, 3.73 gears, carbon fiber clutches, SS Machine lowers, Maximum Motorsport XL subframes, "B" springs.
"and then collapsed the old steel shell with a hammer and chisel"
In the picture the shell and the rubber look still in. Is the picture just a mock up for demo purposes? Maybe I am missing something. The principle looks simple enough.
Thanks

Not bad at all. I took a torch and heated the outside of the shell until I saw a bit of bubbling at the edge. This denoted that the seal had melted. A couple of smacks with a hammer and piece of pipe and they came right out. A bit of sanding to clean up the inside of the shells. FWIW, I bought the bushings without the shells. The new ones went right in with large channel locks and a steel plate. the ball joints I mounted to the car (no reason to put nut on bolt) and used the ball joint tool from Autozone. Was a piece of cake.Originally Posted by 82GTforME

Last edited by Puter; 03-04-2013 at 08:54 AM.
85 GT convertible
The replacement set I got came with replacement sleeves so I assumed that they needed to be replaced. If I don't have to that is a big relief and a huge PITA saver!
As long as you did not damage it taking the old bushing out, you do not have to. Makes teh job a little easier.
85 GT convertible

Replacing the sleeves isn't as bad as it seems. Look at post 29 of my build. http://vb.foureyedpride.com/showthre...t=91819&page=2The replacement set I got came with replacement sleeves so I assumed that they needed to be replaced. If I don't have to that is a big relief and a huge PITA saver!
Dave
If common sense was common wouldn't it just be sense?
1983 Capri L T top 5.0 efi aod
1983 Capri RS Turbo
1981 Black Magic 400 c6
93 F-250 351 5sp 4x4
Mock up for demo purposes. That arm has the sleeves punched out, but I have not knocked out the old shells yet. They come out easily, even without a torch. The shells on mine were rusted enough that I could not justify not replacing them. If yours are ok, you can just replace the rubber inner.
1983 Mustang G.T. No-option stripper- I like strippers.
5.0, GT40P heads, Comp Cams XE270HR-12 on 1.6 rockers, TFI spring kit, Weiand 174 blower, Holley 750 mechanical secondarys, Mishimoto radiator, Edelbrock street performer mechanical pump, BBK shortys, T-5 conversion, 8.8 rear, 3.73 gears, carbon fiber clutches, SS Machine lowers, Maximum Motorsport XL subframes, "B" springs.
Replacing the sleeves isn't as bad as it seems. Look at post 29 of my build. http://vb.foureyedpride.com/showthre...t=91819&page=2.They come out easily, even without a torch
Thanks for all of the great info! This all makes a job so much easier!
Seems like I've ran into a snag today. The Energy Suspension shells that came in my bushing kit have a distinct ledge or lip on the flange side (around 1/2 to 3/4" from the flange). These are not wanting to slide into the arm at all. Using the threaded rod and some square plate approach as shown in some previous posts I am at the point where the arm wants to distort. I'm wanting to taper the lip but I don't want to possibly weaken the shell or still have it not slide in (one front and back are partially inserted up to this ledge and of couse in tight). Any suggestions?Replacing the sleeves isn't as bad as it seems.
Darran
1982-1C (Black) GT T-Top:http://vb.foureyedpride.com/showthre...he-Road-Thread
1986-9L (Oxford White) SVO: http://vb.foureyedpride.com/showthre...d-did-1986-SVO
1979 (85:Tangerine) Coupe (my son's): http://vb.foureyedpride.com/showthre...gerine-Machine
1979 (3F:Light Medium Blue) Coupe (one day to be my other son's!) http://vb.foureyedpride.com/showthre...um-Blue-Bomber!
What I did was to put a good amount of pressure on the bushings with the threaded rod-enough that the arm just started to spring in a little-and then lightly tap the flange on the arm to straighten them back out. This seats the bushing into the flange. I then put pressure on the bushing again, then tapped again-etc etc until the bushing was all the way seated. There is enough spring in the arm that they do not actually bend unless you really pull them over. It takes a little time. The last little bit-like an 1/8 inch or so- I got by just giving the bushings a good whack with a hammer.
1983 Mustang G.T. No-option stripper- I like strippers.
5.0, GT40P heads, Comp Cams XE270HR-12 on 1.6 rockers, TFI spring kit, Weiand 174 blower, Holley 750 mechanical secondarys, Mishimoto radiator, Edelbrock street performer mechanical pump, BBK shortys, T-5 conversion, 8.8 rear, 3.73 gears, carbon fiber clutches, SS Machine lowers, Maximum Motorsport XL subframes, "B" springs.
When I sat back in frustration
Notice in the pictures I put a couple of 3/8 bolts in between and snugged them up so it would not collapse in between the holes.
After getting them in, I think there may be a slight bit of distortion and narrowing between the front and back from the initial tension I had added with the long all-thread. 1/8+" difference from the other one I haven't done yet, but I think I will just reverse the application and spread them back. I don't think it should cause any permanant issues.
Thanks for the input!
Darran
1982-1C (Black) GT T-Top:http://vb.foureyedpride.com/showthre...he-Road-Thread
1986-9L (Oxford White) SVO: http://vb.foureyedpride.com/showthre...d-did-1986-SVO
1979 (85:Tangerine) Coupe (my son's): http://vb.foureyedpride.com/showthre...gerine-Machine
1979 (3F:Light Medium Blue) Coupe (one day to be my other son's!) http://vb.foureyedpride.com/showthre...um-Blue-Bomber!
 Posting Permissions

 Reply With Quote
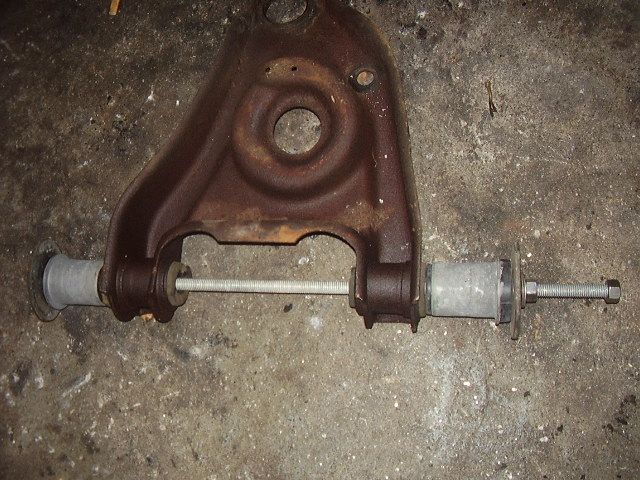
Connect With Us