Close


Results 1 to 20 of 20
  1. #1

    Default removing front and rear coil springs

    What is the best method to remove the rear and front coil springs? I have never done this before so any help would be apprecaited. I just purchased lowering springs for my 1983 Ford Fairmont Futura-I have installed a 5.0 in the car and now want to install these springs. Any help would be apprecaited..

    thanking all in advance,
    Texas Fairmont

  2. #2
    FEP Power Member
    Join Date
    Jul 2009
    Location
    Atlanta, Georgia
    Posts
    2,361

    Default

    The job is fairly straightforward. I just did mine a few weeks ago for the first time. It seems a little daunting if you've never done it before but once I did one side and understood the anatomy of the suspension, the other side went smoothly and quickly. You're going to need a few things:

    1. Hydraulic jack
    2. Jack stands
    3. Wrench and sockets. I recommend a nice big 1/2" drive wrench with a breaker bar
    4. Impact wrench. This is a must for those rusty bolts. I bought one at a local Harbor Freight for like $30. It zipped all the bolts on and off without a snag.

    First, the front:
    -The first thing that you want to do is loosen the nut at the top of the strut tower while the car is on the ground if you are planning on replacing the strut also. Even if you are not going to replace the strut, removing the strut out of the way will make the job so much easier. Just loosen it. Do not remove the nut.
    -Loosen lug nuts on the front wheel and jack the car up onto a stand onto the frame. Remove the wheel.
    -Remove the front caliper and hang it by a wire off to the side so no tension is on the brake line. I also removed the front rotor of the spindle for more room because its difficult to get to the strut bolts behind the rotor with it still in place and next to impossible to remove these without the proper angle of attack.
    -Place a jack under the control arm and pump it up so it just barely lifts the control arm and compresses the strut/spring assembly a bit. Please note that once you disconnect the sway bar link and the strut, the jack is the only thing compressing the spring in the control arm. I tied a rope around the spring to the control arm to keep it from potentially flying out. Springs store a lot of energy so be careful.
    -Remove the sway bar endlink nut. Remove all of the upper and lower strut nuts and remove the strut if you are replacing it. Even if you are not replacing it, removing the strut out of the way will make the job a whole lot easier.
    -Now, the fun part. SLOWWWWWLY lower the jack so the control arm drops and the spring decompresses. Once the spring is decompressed, remove it from its perches in the control arms. This can be a little finicky so you may need a crowbar or prybar to pop it out. Attack it from the bottom and it should pop right out. You may also have to stand on the control arm to push it down to help negotiate the spring out. If you can do it, disconnecting the outer tie rod link will also give the control a wider range of motion but not necessary in most cases. Tie rod links are a pain if you don't have a tie rod tool or a pickle fork. Don't try to bang the tie rod link out with a hammer because it probably won't budge and you run the risk of mushrooming the bolt head.
    -Replace all of the new components in reverse order. Getting the new spring to perch in place is the hardest part of the job IMO. A lot of prybarring and control arm standing is usually needed. A second person to help would probably make this job easier. Maximum Motorsports makes a tool that helps seat the spring more easily so you might consider this.

    The rears are essentially the same process. The rears are infitely easier IMO because everything has a fairly straight angle of attack. The anatomy of the control arms and the axles are a tad different but the same overall concept.

    Some links below. I assume that Fox suspensions are similar across the board. I again cannot strees enough how handy an electric wrench is for these types of jobs. The bolts came off like butter with the impact wrench. Tried the breaker bar first on the strut nuts and no go. Wouldn't budge.

    Rear:
    http://blog.stangsuspension.com/2011...body-mustangs/

    Front:
    http://blog.stangsuspension.com/2011...install-guide/

    Removing front rotor/wheel bearing assembly:
    http://www.youtube.com/watch?v=7zywHnpQO88

    Maximum Motorsports tool in action:
    http://www.youtube.com/watch?v=7zywHnpQO88
    Last edited by HAD85B4; 01-18-2013 at 05:09 PM.

  3. #3

    Default

    Front coil springs arent designed to hold the car up..... They are designed to kill you. Always remember that!
    Dan

    1985 Lincoln Continental. T-5, Bullit wheels, Mustang springs and Hybrid Lincoln/Mustang control arms, 8.8 w 3.27s, Cobra swaybar, adjustable struts and shocks....

  4. #4
    FEP Power Member
    Join Date
    Jul 2009
    Location
    Atlanta, Georgia
    Posts
    2,361

    Default

    Quote Originally Posted by Floyd View Post
    Front coil springs arent designed to hold the car up..... They are designed to kill you. Always remember that!
    That was the hairiest part of the job for me. I lowered the control arm a millimeter at a time and had the spring roped to the control arm. I also set the jack handle so it was coming out from under the front of the car and crouched in front of the headlight away from the wheelwell area as I lowered the control arm. You can tell when lowering the jack that the spring wants to pop open and wreak all kinds of havoc.

  5. #5

    Default

    Quote Originally Posted by Floyd View Post
    Front coil springs arent designed to hold the car up..... They are designed to kill you. Always remember that!
    Fact, I've been chased across the shop by them. If you're not saving them cut them with a torch, much safer.
    81 Fairmont wagon,528 on E-85,just a brutal street car

  6. #6

    Default

    I find it's easier and safer to leave the strut attached to the spindle / ball joint and to remove the control arm bolts from the K member. I run a chain through the middle of the spring and A arm to keep the whole assembly tight to the K memeber. The spring remains relatively captured behind the strut. Also when re-installing the spring it lets you get the tail lined up in the pocket of the A arm and push it straight up, rather than bending it around.
    The Fleet:

    '79 Fairmont Boxtop: The turbo-box
    '79 Fairmont Boxtop: The wife's car. 200/auto, factory sunroof.
    2010 Chevy Silverado: The DD/Tow rig.

  7. #7
    FEP Power Member
    Join Date
    Jul 2009
    Location
    Atlanta, Georgia
    Posts
    2,361

    Default

    Approaching from the inside at the k member would require a lot of experience with these types of jobs. Taking your time from the outside in would be the simpler approach in this particular case IMO.

  8. #8
    FEP Member ratio411's Avatar
    Join Date
    Apr 2011
    Location
    Pensacola, Florida
    Posts
    275

    Default

    Quote Originally Posted by Floyd View Post
    Front coil springs arent designed to hold the car up..... They are designed to kill you. Always remember that!
    YES! Be safe!

    The front springs are dangerous, and you MUST be safe about it.

    There is a device that puts a threaded rod up into your spring through the hole in the arm, and then you slide a bar in between the coils about 2/3 the way up the spring, and use the threaded rod to bolt to that bar.

    Now you can slowly compress the spring using the bar and tightening the nut on the threaded rod that is holding the bar. Borrow the tool from AZ or Advance, and borrow the correct one (internal compressor, not external).

    IMO, someone that has never done this before has no business either doing it without a purpose made compressor, or by using a home made setup. Get the right tool, use the safety features, and take your time.

    We all had to do it a first time, but didn't cut corners that time if we were smart. After you have done it a few times, you will know when you need a compressor, and when you don't. You will also know how to make your own compressor that is taylored to your car exactly, instead of one made for 50 different models, and is a compromise on efficiency (not safety mind you), on your specific car.

  9. #9
    FEP Member ratio411's Avatar
    Join Date
    Apr 2011
    Location
    Pensacola, Florida
    Posts
    275

    Default

    Quote Originally Posted by HAD85B4 View Post
    Approaching from the inside at the k member would require a lot of experience with these types of jobs. Taking your time from the outside in would be the simpler approach in this particular case IMO.
    Big agreement here as well!

  10. #10
    FEP Member ratio411's Avatar
    Join Date
    Apr 2011
    Location
    Pensacola, Florida
    Posts
    275

    Default

    Quote Originally Posted by HAD85B4 View Post
    -Now, the fun part. SLOWWWWWLY lower the jack so the control arm drops and the spring decompresses. Once the spring is decompressed, remove it from its perches in the control arms.
    The problem with not using a compressor is that in most occaisions, stock springs don't fully decompress, not even to a 'safe' level of compression, before the jack has lost it's mechanical advantage over the a-arm, which is trying to go from horizontal to vertical as the long stock spring expands.

    Once the jack vs a-arm angle becomes too great for the jack to control, BAM!, the spring is flying at your teeth.

    Aftermarket springs are much better, as they don't stand as tall as stock linear springs, and the lowering springs will often fully decompress and fall on the ground before the jack becomes compromised by the angle of the a-arm.

  11. #11
    FEP Senior Member waggin's Avatar
    Join Date
    Sep 2009
    Location
    Mount Vernon, WA
    Posts
    586

    Default

    Quote Originally Posted by ratio411 View Post
    YES! Be safe!

    The front springs are dangerous, and you MUST be safe about it.

    There is a device that puts a threaded rod up into your spring through the hole in the arm, and then you slide a bar in between the coils about 2/3 the way up the spring, and use the threaded rod to bolt to that bar.

    Now you can slowly compress the spring using the bar and tightening the nut on the threaded rod that is holding the bar. Borrow the tool from AZ or Advance, and borrow the correct one (internal compressor, not external).

    IMO, someone that has never done this before has no business either doing it without a purpose made compressor, or by using a home made setup. Get the right tool, use the safety features, and take your time.

    We all had to do it a first time, but didn't cut corners that time if we were smart. After you have done it a few times, you will know when you need a compressor, and when you don't. You will also know how to make your own compressor that is taylored to your car exactly, instead of one made for 50 different models, and is a compromise on efficiency (not safety mind you), on your specific car.
    I picked up something virtually identical to this, which I'm assuming will fit to safely work w/Fox springs when I disassemble my Mustang/Fairmont stuff. Any pros/cons or special tips and cautions when using these? TIA.

    http://www.amazon.com/OEM-25550-Stru...8797594&sr=1-1
    '78 Fairmont Box Top w/Straight 6/3-spd Manual Everything
    '81 Zephyr Wagon 4/4-spd
    '84 Mustang SVO 5.0 Swapped semi-junker (I didn't do it!)
    MAF, GT-40, BBK Shorties

  12. #12
    FEP Power Member gmatt's Avatar
    Join Date
    Jul 2009
    Location
    Chicago, south subs
    Posts
    2,136

    Default

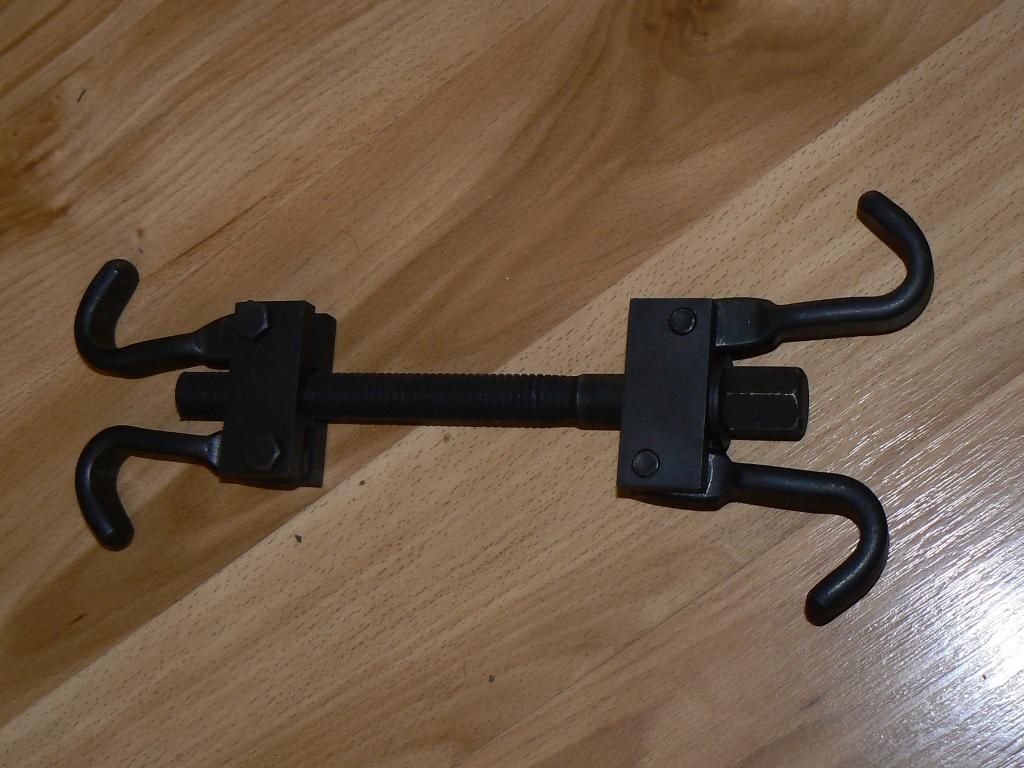
    Get one of these. Not too $$. I had to shorten the threaded part to get it to fit. Also, had to dis-assemble, put the parts inside the spring and re-assemble, a bit of a pain, but not as much as getting hit with that spring.
    Last edited by gmatt; 01-21-2013 at 03:21 PM.

  13. #13
    FEP Member ratio411's Avatar
    Join Date
    Apr 2011
    Location
    Pensacola, Florida
    Posts
    275

    Default

    Quote Originally Posted by waggin View Post
    I picked up something virtually identical to this, which I'm assuming will fit to safely work w/Fox springs when I disassemble my Mustang/Fairmont stuff. Any pros/cons or special tips and cautions when using these? TIA.

    http://www.amazon.com/OEM-25550-Stru...8797594&sr=1-1
    Edit: Looking at the reviews on that one, and from the pics, it is different than mine, and might be enough that it could work on our cars... ???
    Let us know.


    That is an external compressor.
    They work well on GM applications where the spring is over the strut.
    I wasn't able to get mine to work on a Fox.

    gmatt posted a pic of an internal unit, and like he said, it takes some tayloring to fit, and you have to piece it together inside the spring, but that is the safest tool.

    I made my own out of some grade 8 threaded rod and a 5/16"-ish thick flat piece of tool steel from another tool. I put the threaded rod up through a hole in the a-arm, with a steel plate washer and bolt on the bottom, and then with another plate washer and bolt, went through the hole in the center of the steel bar. You must make sure the bar is long enough though, that if it slips to either direction, it is still on both sides of the spring. The first bar I used was a bit too short, and a little hairy when it tried to go to one side. I almost lost it. If you get it just right, this way will keep the spring compressed against the a-arm, and you can decompress it with the nuts on the threaded rod after the top end of the coil is free of the car.

    Just don't try to compress it more than needed with threaded rod. I used the largest rod that would fit in the a-arm hole, it was at LEAST 1/2" rod, if not 5/8", I don't recall exactly. MUST be grade 8 as well. 1/2" threaded rod will hold at least 1000# per rod in my experience, I have lifted concrete blocks weighing that much with one 1/2" rod in my work, but you must have a full nut of threads on it, plus some threads sticking out of the other side of the nuts to be safe.
    Last edited by ratio411; 01-21-2013 at 03:55 PM.

  14. #14
    FEP Member ratio411's Avatar
    Join Date
    Apr 2011
    Location
    Pensacola, Florida
    Posts
    275

    Default


    This is similar to the contraption I use, with 2 big exceptions...
    1: I don't use a bottom strap as the a-arm acts as the bottom strap on our cars.
    2: I didn't use such thin metal for straps. I used tool steel bar from another compressor or puller tool from the puller drawer in my tool box. I guess what is in the pic would work, but it looks a bit thin to me. Probably holds the spring better than what I was using though.

  15. #15

    Default

    To remove, I just lowered the jack from under the control arm, then pried the old spring out.

    To install, I used the tool that I rented for free from Auto Zone. I did not even buy the springs from there!
    Using it was hard and you had to assemble it inside the spring. It was very hard to disassemble and remove once the spring was in.


    The manual says to use this tool. It is expensive if you are only going to use it once. I could not find any rental yards that had it.

    www.amazon.com/OTC-7045B-Front-Spring-Compressor/dp/B000GTJ5I8/ref=pd_sim_sbs_misc_2

    Next time I will try and make a tool like ratio411 pictured.
    I have the tool waggin linked, could not use it, not enough clearance.
    Rear springs were removed and replaced only using a jack.
    Lots of FREE F/Z info on my site.
    http://myzephyrs.com

  16. #16

    Default

    I've always found that because of how much the springs curve when the LCA is at full droop spring compressors are about worthless. That's why I go from the inside.
    The Fleet:

    '79 Fairmont Boxtop: The turbo-box
    '79 Fairmont Boxtop: The wife's car. 200/auto, factory sunroof.
    2010 Chevy Silverado: The DD/Tow rig.

  17. #17
    FEP Power Member
    Join Date
    Jul 2009
    Location
    Atlanta, Georgia
    Posts
    2,361

    Default

    While not completely decompressed when the LCA is down, the spring is decompressed enough to where the majority of its energy is released. Its still under a little tension but not enough to fly out. Its during the actual lowering that the spring may fly out. This is why I specifically mentioned tying the spring to the control arm with a rope or chain etc.

  18. #18

    Default

    I have a 1983 Ford Fairmont Futura coupe
    I have a question-I received my 2" lowering springs and I compared my rear springs (not compressed) and the lowering springs are the same length. My question is this are the stock front springs longer or shorter than the stock rear springs
    Last edited by texasfairmont; 01-27-2013 at 05:55 PM.

  19. #19

    Default

    Looking at my pictures before I put them in, they both have 9 coils counting from the top end. The fronts look taller. The rears are bigger in diameter.
    Someone cut the originals.
    FRONT

    REAR
    Last edited by RED 78'; 01-27-2013 at 07:08 PM.
    Lots of FREE F/Z info on my site.
    http://myzephyrs.com

  20. #20

    Default

    thanks for the info I have the rears installed now and will be doing the fronts tomorrow-my new springs will lower the front and back 2 inches....

Tags for this Thread

Posting Permissions

  • You may not post new threads
  • You may not post replies
  • You may not post attachments
  • You may not edit your posts
  •