
also what front brakes are those?


also what front brakes are those?


Very nice build thread

started this week on a productive note, I got a recurve kit for my duraspark distributor and an msd cap, new vac advance canister, painted the cap adapter black, and took a wire brush to the aluminum base. I think it looks awesome for the amount of money I have into it. plus its more reliable than some aftermarket distributor.
got myself a budget powdercoating setup and did my first few parts over the weekend
I seriously impressed myself with how these turned out
its all starting to come together quite nicely
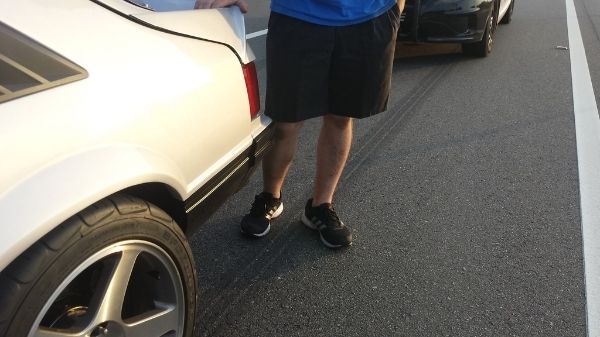
found a new body shop 30 minutes south of me that is willing to take on the mustang project including the roof and paint/body. had to roll it out of the garage the other day to take some pictures and it looks so goofy with the 4 lug front and irs. anyways, its getting dropped off at the shop tomorrow afternoon with a deposit to start work. its hard to believe that its finally happening and I'm excited to say the least
I was starting to forget what it looked like with a front clip on. one last picture for good measure
Also, if anyone has questions about my car, please just send me a pm instead of posting here. I'll respond much quicker and it keeps this cleaner. Thanks
Last edited by dk5_cobra; 03-07-2016 at 11:18 PM.
dropped the car off yesterday (3/8/16) at Affordable Rods & Restorations. its about 30 minutes south of me and they do mostly mopar stuff but the quality of their finished work is fantastic. Im excited to finally have this process started.
this is certainly a strange view. but its a good chance to clean out the garage and get everything organized for when the car does come back
distributor timed, plug wires run (its an art to get them to look good)
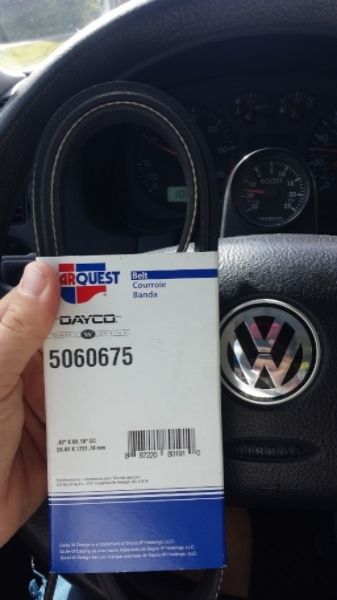
also measured for, and bought an accessory belt. posting the part number here for future reference.
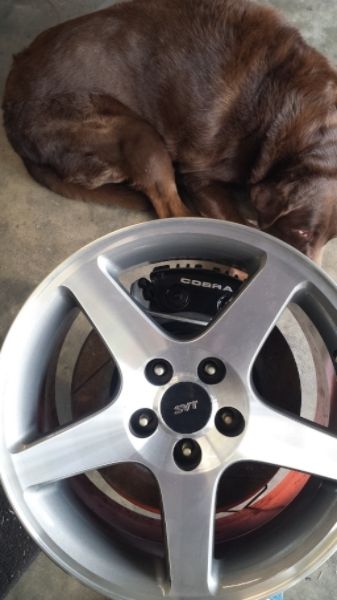
wheel update: I took my 17x9 et26 svt wheels and milled 4mm of material off of the back pad to help them fit in the fenders better. This makes them et30 by the numbers. Just took 2 hours at my dad's cnc machine shop to write the program, generate code, and press the button. Program run time on each wheel was around 10 minutes once we got it all figured out.
Since the wheels are finished now, I ordered tires for them today. A set of 4 BFGoodrich Rivals (255 40 17) will be here next week to be mounted. They're an extremely impressive tire (as long as its not wet out)
spent the weekend sandblasting my front calipers and brackets. steps taken were: sandblast, clean, paint (color, clear), assemble, tape off letters, and finally file them down.

Excellent work, I've enjoyed reading your thread through the highs and lows. Keep it up! You're closing in on the home stretch!
Sent from my VS986 using Tapatalk
'84 Tu Tone Coupe 5.0/T-5 Dark Academy Blue/Light Academy Blue Glow
'86 Mercury ASC McLaren Coupe 049 - November '16 ROTM
picking up where I left off with wheels and tires
now as far as the car itself, Its at the body shop, fully primed, just getting the little details worked on before it gets painted (hopefully sometime in the next week) which means what started out as an 8 week turnaround time, ended up being only 3 weeks, which put me on a major crunch to get some other details wrapped up first. more on that in a bit.
now, before I bring the car home I needed to finish painting all of my interior panels. which I knew was a large undertaking especially on such short notice. thankfully the weather held out long enough for me this last weekend to do it all. and it looks amazing. pictures do it only a little justice. especially on the before/after pics. but I am blown away as to the quality of everything.
first, BUY A QUALITY RESPIRATOR. seriously though, this was something I've been putting off way too long. now, first I scrubbed all of the pieces with gojo soap to scuff and clean them, and then detail washed some of the dirtier pieces with a nylon brush and some dawn. then I wiped everything down with a rag and SEM plastic and leather prep spray. finally, to start the painting process, I used SEM plastic adhesion promoter 39863 (in a rattle can so I didnt have to stop and clean my paint gun in the middle of everything) according to the instructions, one light coat, 5 minutes flash, then a medium/wet coat, and 15 minutes flash. then I loaded up my paint gun with SEM color coat 15014 and hit everything with a light but full coat, let it flash for 10 minutes and then went back with a medium/wet coat. side note: for the metal trim that supports the headliner, I used the same method but I didnt spray them with the adhesion promoter. they end result is exactly the same as with the rest of the pieces.
the restults are stunning and I would not hesitate to recommend this exact methodology to anyone. (I'm not sure if the adhesion promoter is necessary since I've read about other people being fine without it, but why not go the extra step if you're going this far?) anyways.
while doing all this thinking about interior stuff, I figured I'd work on a couple details. first off, I had 2 sets of sun visors, one set had mint mounting rods but torn up vinyl, the other set had rusty rods and dirty but saveable vinyl. I scrubbed the vinyl with a nylon brush and dawn 5x in the kitchen sink and they eventually came clean and look brand new. sorry I didnt take before pics of them but ill put it this way, I was very close to just throwing them away before. and as always, some 00 steel wool worked magic on the chrome at taking the little bit of rust off. I'm always impressed as to what it can do
still thinking about the interior, I dug out the box with my seatbelts in it because I wanted to make sure they wouldn't have to be replaced (which is expensive). and I thought my front pair was junk because the looked quite faded. well I decided to have a go at them with the same brush and dawn in the same kitchen sink and scrubbed them for a long time until the soap stopped turning brown. this took a good while but after hanging them up to dry overnight they look brand new too. also took steel wool to both halves of the latch mechanism.
the moral of the story is to always give parts a 2nd chance (and a good cleaning) before relegating them to the scrap pile. you may have more than you realized.
to bring this long winded update to a close, the car is supposed to be done at the painters by the end of next week. from then it will be very fast progress on the reassembly and the only thing that should slow me down really is the re-wiring of the engine since I welded the holes shut in my engine bay and need to re-route everything. I put in a huge order with foxresto.com for tons of exterior hardware pieces, door handles, marker lights, and a matching set of 79-83 lock cylinders with keys and everything. carpet was ordered last week from stockinteriors.com and will be here monday, and I ordered the cobra hood vinyl from phoenixgraphix which will also be here on monday. I can't wait to see it because I've never actually seen it in person before.
I'll do my best to document everything in the coming weeks. goal is to get it running as soon as possible and then I'm planning to drive it from Fl to NC at the end of July for a yearly event with my friends in Robbinsville for some mountain road driving around us129 or the tail of the dragon. A LOT has to happen between now and then but we'll see. plenty of sleepless nights to come surely


The interior plastic looks really nice. Good job
1979 Mustang Cobra 5.0
2P Red and 1C Black
Stock never goes out of style
MCA #70281 - 79-93 MCA Concours Judge
Proverbs 3:5-6
My Mustang Story
http://vb.foureyedpride.com/showthre...71#post1688371
got the car back from the body shop about 2 weeks ago on friday the 1st. by friday night I had all of my maximum motorsports front suspension parts installed and the engine dropped in. by saturday I had my transmission installed, carpet in and mostly trimmed, front seats, and my pedal cluster and steering column in. Over the course of the next week I worked on extending my ignition box/coil wires to my distributor along with re-routing the rest of the wiring that used to run in the engine bay. My battery is in the hatch area as well. There are a million little details that I've put time into and I hope I can capture them all here through pictures.
I first fired the engine on the 9th as a proof of concept for my wiring which was exciting. since I ditched the stock starter solenoid I have to make a new main power wire that feeds my dash harness and then trim out my stock alternator wiring. then I can mount the dash up, glue in the windshield and be close to driving it. onto the pics.
I drilled out the original rivets that attach the bumper cover to the header panel and replaced them with stainless hardware. one of those details I mentioned
installing the louvers was a bit terrifying but all went well. this picture also shows how perfect the wheels fit. 4mm was the trick.
the body shop didn't paint my door and quarter window frames black so I had to. just involved a lot of newspaper and all of my moving blankets. came out perfect though.
trim installed and quarter window sealed up
door decals installed, used masking tape that I put down as a guide to ensure it ended up level and in the same spot as the other side
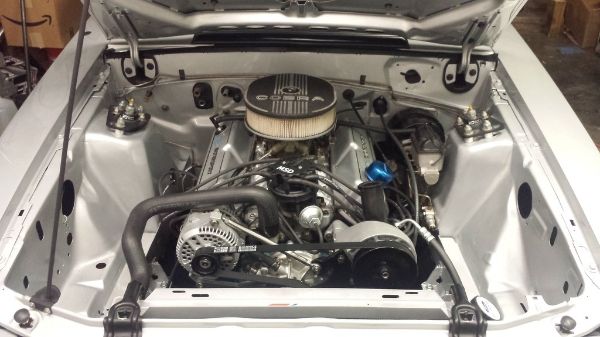
all of that hard work in the engine bay was worth it. (if only my carb looked better, oh well. itll be covered by air cleaner anyways..) This is a running configuration right here. my coil, distributor, oil pressure sender, coolant temp sender, and starter trigger wire are run in a loom through the transmission tunnel and under the intake manifold.
for my exhaust I picked up an slp irs catback with their loudmouth2 "mufflers" (they're barely large enough to be called resonators but they call them mufflers) to use with my H pipe that was originally built for an sra exhaust. with the handy use of a sawzall, a hammer, some prybars, and a little welding, it went together perfectly with my longtubes. so its 2.5" all the way back and realllyy loud. the 2x4 you see at the rear is to ensure that the parts of the tailpipe that you see are perfectly level. you can also see where I spent a ton of time polishing the stainless. when it's on the car, it pops. really sets off the rear end of the car.
this week I'd like to get my electric fans wired up, fill it with antifreeze so I can let it run for an extended period of time
Double post
Last edited by dk5_cobra; 04-14-2016 at 07:27 AM.

Looking good!
1985 Mercury Marquis LTS... "The Unicorn"
1978 Fairmont... 306 and a C4.


Yes Sir, that thing is looking great! We need a update - although you're probably done.
88 Turbo Coupe auto
88 Turbo Coupe 5spd
79 Fairmont Futura 4.6
79 Capri RS - 2.3/5spd restomod
80 Capri 5.0/5spd project
79 Zephyr Z7 factory 5.0 sunroof
79 Pace Car 5.0/5spd project
85 LTD LX factory 5spd?(not documented)
86 GT conv 5.0/5spd
79 Pace Car 2.3/4spd - needs new home

I can't believe I've been away from this site for this long. You've made some amazing progress.
Craig "IDMooseMan" Peters
1979 Mustang Ghia Notchback, 2.3L, Holley 5200, 4-spd, 3.08:1 7.5" diff, A/C, PS, PB, AM/FM/8-Track, Sunroof, Rear Defroster
USAF SSgt 63170 1983 - 1992; Co-Founder, Vice President, Omega Delta Sigma, ID-A 2/2015
To those that serve and have served, "Thank You", to those that haven't, "You're Welcome"
2.3L Horsepower Potential Thread
Buyer/Seller Experience Link
Build Thread
The Four-Eyed Game - 2018 Version
Great work, this is very similar to what I'm hoping to do with my coupe.
Dash installed along with all of my interior except my door panels (because i am short a piece of door glass) finally got my timing set, and carb tuned. Went to a 5.0 power valve (vs the 6.5 that was in there) and that helped my off the line stumble. got some lx style tips that I mated up to the irs catback to keep the classic fox look. set my bumpsteer, got an alignment.
I used leftover riv nuts from the louver installation to secure the battery to the trunk floor. 175a circuit breaker on the battery itself makes it easy to disconnect it when needed. (no plans for sanctioned racing requiring an external cutoff switch)
pardon my zip tie hanger. that's been fixed and the tip has been shortened so it doesn't stick out of the rear end so far
put about 80 miles on it that week. until the car came to a screeching halt when I was cruising down the road after a short highway trip.
pulled the transmission out and the freeze plug on the back of the shifter was missing. and there was only 1/2 of a quart of atf in it and was siezed up. all of the gears are trashed and I'm basically left with a housing. so I have a complete rebuilt T5 coming this week and it should be back on the road soon. The down time gives me a chance to fix my oil leak coming from my timing cover and to recover from the back breaking, sleep deprived month that April was. I will say this though. This car drives like no mustang I've ever felt before and its absolutely unreal and I can't wait to put more miles on it

Devin, It's looking great! Keep on going, you're almost to the finish line.
Pete Slaney
1979 Mustang Cobra
347/T-5/4.30's
420 rwhp/380 rwt (New Motor)
11.49 @ 121.86
306/T-5/4.30's (Old Motor)
307 rwhp/278 rwt
12.38 @ 111.38
while waiting on the transmission to arrive, I did a few things.
got a cool license plate frame off of ebay
got and installed a new cxracing aluminum radiator because my original started to weep out from one of the end tanks. cxracing is an eBay company but their intercooler cores and radiators are top notch (been running a front mount intercooler from them on my daily vw gti for 3 years now) so for $125 this radiator is a fantastic piece. especially when you look and see what latemodelresto and other companies are selling the exact same radiator for (around $200!!!) well I made a bung for my electric fan thermoswitch and had a friend weld it in place (never put a thermoswitch in the intake manifold, it will heat soak and your fans will run for a long time) my fans are relayed and hooked up to direct battery power but only run when I am driving slowly and after I shut the engine off they shut off in less than a minute. I was going to make a shroud for the fans but so far they have no problem maintaining coolant temp without one. so I may just leave them the way they are.
powdercoated my bellhousing (and then installed my transmission)
this is what I'm running in the new t5. its about $10 a quart and I'm a fan of their transmission oils
got a stereo and speakers wired up. took me a while to find a head unit that I liked because I absolutely despise a lot of them and all their flashy buttons and crazy designs. This kenwood integrates flawlessly with my ipod and phone. The Hurst shift boot is a new addition as well
I picked up a set of arm rests because my set went missing at some point. only downside...They're blue..
nothing some sem color coat cant fix. love this stuff
the repop outer dew wipes were about 1/2" too short so I ended up repainting my original metal trim, and then swapping the new rubbers onto them. had to slightly modify the trim piece but that was it. after that it went together flawlessly
door panels needed carpet. since nobody makes drop in carpet for 79 door panels you're left to make your own. this cost me $10 at lowe's and is just a big piece of indoor/outdoor carpet that is almost an exact match to the original stuff. just rough trim, set in place, give it an exact trim with a razor blade, then spray adhesive on the panel and the carpet and stick them together once it tacks up.
and then some random pictures that I like:
the throw pillow makes these halo headrests actually comfortable for the passenger trying to rest (made a highway trip about 40 minutes south over this previous weekend to get the driver's side door glass)
got 250 miles on the odometer as of today, and on the highway trip I mentioned I got 13.6 mpg. I'm definitely running rich so I believe there is some room for improvement on that figure (I sure hope so)
on this highway trip, zero engine/exhaust heat was transmitted into the cabin. I would recommend the lizardskin products to anyone building a car that they want to be comfortable. the exhaust is very very very loud outside the car but inside its 100% reasonable. all in all, the lizardskin was worth the money spent
oh and one of the aspects of this car that I'm especially proud of...the engine bay. truly a labor of love
Excellent work Devin!
Pete Slaney
1979 Mustang Cobra
347/T-5/4.30's
420 rwhp/380 rwt (New Motor)
11.49 @ 121.86
306/T-5/4.30's (Old Motor)
307 rwhp/278 rwt
12.38 @ 111.38
Man, this car is beautiful! You've done a fantastic job.
88 Turbo Coupe auto
88 Turbo Coupe 5spd
79 Fairmont Futura 4.6
79 Capri RS - 2.3/5spd restomod
80 Capri 5.0/5spd project
79 Zephyr Z7 factory 5.0 sunroof
79 Pace Car 5.0/5spd project
85 LTD LX factory 5spd?(not documented)
86 GT conv 5.0/5spd
79 Pace Car 2.3/4spd - needs new home

Love this car. Just saw it here on FEP... I follow you on IG 😉
Messing around on my phone...
1986 Ford Mustang GT-
Not much stock stuff left
347 NA power, CNC ported heads, Extrude honed Trick Flow Intake, Custom Cam
Suspension, custom k- member, TQ arm/pan hard rod... Much more
Restored and ready to race, made to go fast while cornering
1981 Mustang GT-
Old SCCA A-Sedan National Champ car
In the middle of rebuild
1986 LX Sedan-
Plans to be determined...
"Every day I learn how much I don't know"

Just came across this thread for the first time since March 2014, and WOW! What an awesome, high end build!
Perfect mods! Just love it!
Last edited by danco86; 06-07-2016 at 10:11 PM.
Dan
http://vb.foureyedpride.com/showthre...ng-GT-restomod
1986 Mustang GT Cobra
Lotsa stuff, lotsa work. Check my thread above.
Daily drivers
2002 F-350 7.3 Powerstroke crew 4X4
2012 F-150 Ecoboost Screw FX4
What's his IG?Originally Posted by Mikestang

soiateapancaketoday
Curious where he came up with that name 🤔
Messing around on my phone...
1986 Ford Mustang GT-
Not much stock stuff left
347 NA power, CNC ported heads, Extrude honed Trick Flow Intake, Custom Cam
Suspension, custom k- member, TQ arm/pan hard rod... Much more
Restored and ready to race, made to go fast while cornering
1981 Mustang GT-
Old SCCA A-Sedan National Champ car
In the middle of rebuild
1986 LX Sedan-
Plans to be determined...
"Every day I learn how much I don't know"
Hey mike! And Basin motorsports - i follow you already.
The name is just a stupid name i came up with.
Im dealing with a high speed vibration over 75mph that feels like driveshaft balance or pinion angle. Trying a few things this week to try and cure it but ill post in here when i do solve it. Seems like a fairly common complaint online with foxs and edge cobras with irs and solid axle alike
Sent from my SM-G900P using Tapatalk
Devin
1979 Mustang Cobra - IRS, MM Suspension, 302/t5
Check out my build thread for tons of IRS info, and general restoration help. There's a little bit of everything -->goo.gl/krmqNz
Pm's welcome if you have any questions
 Posting Permissions

 Reply With Quote


Connect With Us